Black Cap Mountain, Oct 14th

While visiting some friends in the east coast, we headed a bit north to the Conway State Forest to check out the fall colors. That’s where I learned there’s actually a term for this – leaf peepers. We did a short but very rewarding hike to the top of Black Cap Mountain that offers a bit of both, looks from within the forest and ample views of colored valleys. We started from the trailhead along Hurricane Mountain Rd. heading south. The trail is very family friendly so not easy to get disoriented or lost here. The first part of the hike meanders thru the forest which, this time of year, is covered with multicolored leaves ranging from the bright yellow to the bright red. At spots you can almost miss the trail under this carpet. Taking your time to see the different leaves reveals patterns, shapes and colors that make the whole mix. The obvious maple is the most common one but some others look like some radioactive goo is running inside them. As you gain elevation, the forest starts to clear out and you start finding rocky steps. Then, you are above the tree line and here you must stop and look around. The valleys around you are all tainted in red and yellow. In the pictures you can get an idea but it’s not even close to how it looks when you are right there. We continued all the way to the very top which is not the best viewpoint. We stayed there for a bit and then headed back down the same way making several stops at different rock outcrops to take in some of the scenery. Truly a must see
You can see the rest of the pictures here

Interactive map

To see the full map, click here


Huckleberry Mountain, Oct 1st

Huckleberry is always a fun hike with very nice rewards once you get to the saddle. If you have good weather and clear skies, the views can be quite spectacular with Mt Hood at arm’s length and several other cascade peaks in view. If weather does not cooperate, you still get views of the Salmon River valley below. So without much to lose, Val and I picked this hike for a wet and rainy day. Most of the hike is forested so you are always under the canopy of really tall trees. With all the rain we’ve been having though, the forest floor was a mushroom party and the salamanders were happy about it. As we hiked up, we had to take care not to step on the little guys as they crossed the trail or walked along it. About half way up the trail, there’s a turn with an outcrop and a pretty decent viewpoint that looks straight to Zigzag mountain across the valley. From there we could see a thick layer of clouds covering the sky and Mt Hood. We knew we were not going to get the views this time. But still, we continued up enjoying the green and the forest which we had all to ourselves. We made a short stop at the viewpoint in the saddle to eat a sandwich with no views before heading back down the same way – still trying not to step on the Salamanders.

You can see the rest of the pictures here

Interactive map

To see the full map, click here

Zigzag Overlook from Hidden Lake, Sep 16th

About a year ago I did this hike combining two trails, the hidden Lake trail and the Paradise Park trail. The loop was fantastic but the reason was to get the view from the overlook without having to retrace back to the parking lot. That time, clouds were hanging very low so we got a very limited view of the Zigzag Canyon and no Mt Hood as a backdrop. So this time, we decided to head up there via the Hidden Lake trail to check it out and then head back down. From the drive there we knew we were in luck and that we were going to get the views. The hike up meanders thru the forest without a lot of views so it went quickly until we reached the Timberline trail. By then, the views expanded around us and we saw a lot of hikers, both PCTers and hikers coming from the shorter path from Timberline Lodge. After a couple of ups and downs we got to the viewpoint where we stopped for lunch and pictures. On our way back, we retraced our steps but made a quick detour to check Hidden Lake. It looked more like a mud pond than a lake and we saw a couple of campsite on the eastern side. Since those didn’t give access or views of the lake, we went around and were able to get a glimpse of it. It’s certainly a lake you can’t seem to be able to get close to. While checking it out, we heard a family heading to one of the campsite on the other side (we had crossed path with them before). At some point the laughter and talking changed to what seemed like screams. Thru the bushes I saw the woman drop her backpack and run so we decided to go around and check what was going on. It seems the sat on a log to have lunch and were attached by yellow jackets. The poor kids were screaming in pain so we all got our first aid kits out and gave them after bite to relieve the pain. WE stayed with the for a little bit and then headed back down. While pulling off from the parking area, we saw them come out of the trail all smiling again and thankful that we were there to help them. I guess it’s part of the adventure.

You can see the rest of the pictures here

Interactive map

To see the full map, click here

Olallie Lake Scenic Area, Sep 16

Val and I went thru different ideas for this three-day weekend that included the Wallowas and some other places in northern California. The weather didn’t look good anywhere so we opted for something closer and maybe more relaxing. Originally the plan was to head to Wall Lake and hike around the area. The hike we had planned for the first day was short so we were not in a hurry to get on the trail. While driving there, we made a call to turn and head to the Olallie Lake Resort to check it out and once there, we changed the plan again.

Day 1: Olallie Lake to Averill Lake

Once parked, right outside the campground entrance, we got on the PCT heading west. The first part gained a bit of elevation and gave us a glimpse of Olallie Lake but not much more due to grey skies. AS we snaked thru the areas, multiple ponds and little lakes appeared on both sides. We followed the PCT for a while until it topped out around Twin Peaks and started descending on the other side. From there, we took our first turn heading to our original destination at Wall Lake. Part of the route was in the forest descending pretty quickly to a small chain of lakes starting with Fork Lake and the Deer Lake. A couple of minutes later, we got to Wall Lake to find the main campsites already taken so we decided to continue on and check the following lake. At this point, the trail was following a small stream that connects all these lakes and at some point we got to Averill Lake with a big, empty site on the north shore right next to the trail. We thought for a minute of staying there but being so close to the trail made us explore a bit. We found a user trail following the north side that lead to an even bigger campsite with a huge fire pit. Several user trail continued from there. One of them headed closer to the lake and on that one, we found a perfect spot for our tent just steps away from the water. By then, the sky had mostly cleared so we had a chance to enjoy the peaceful view of the rocks in the lake.


Day 2: Averill Lake to Timber Lake

On day two we woke up to a cold and foggy morning. The view of the lake was completely different from the view we had the night before. After a warm breakfast and coffee, we packet our gear and got on the trail to retrace our steps back to the PCT. All the lakes in the way had the same eerie look with fog flying slowly over the water. It almost looked like they were haunted. The trail itself looked quite different on the way up. We then took the PCT heading south to the junction with the Top Lake trail. On that short section we crossed several PCTers fast pacing north. We took the Top Lake trail for a short distance until we veered off on a less used trail towards Timber Lake. The trail itself was not very picturesque as it went thru a section of dead forest but soon it descended to the North Shore of Timber Lake. When we got there, we found nobody so we had the lake entirely to ourselves. We continued counterclockwise on the lake and found a large, exposed campsite with a fire pit. We were not very excited about the site and the little excitement we had diminished even more when we saw an abandoned outhouse. We continued on but didn’t see a trail around the lake. Later we found out we had just missed it. Still, since we had most of the day still ahead of us, we retraced our steps and decided to go look for other options around the lake going clockwise. Towards the eastern shore we found a small grass meadow that extended to a small pond with multiple deer and elk tracks. We thought for a minute of setting up there but didn’t find any firm ground so we continued on. The southern shore of the lake got rough pretty quick with a rocky shore and lots of underbrush. We thought about returning but kept pushing on and it seemed like there was a possibility ahead. We did pass several places that looked promising from the distance but ended up being not usable. Finally, we found the user trail and continue towards the north side and finally found a little promontory with a perfect spot right in front of the lake. There was space for more tents so we set up right next to where the fire ring was giving us views and access to the water. After lunch, I hung the hammock between two trees right in front of the water so we spent the rest of the day just swinging in there, reading a book and just enjoying the views.

Day 3: Timber Lake to Olallie Lake

Day three started almost with no clouds and the sun coming sideways and illuminating the other side of the lake. As we made breakfast, we saw the forest turn intense yellow and the fog start to lift from the lake surface. At one point, it seemed like a ball of fire was going to roll into the lake. It was quite spectacular. Not rushing, we packed our gear and got on the trail retracing the Timber Lake trail back to the Top Lake trail. We had the choice to head back on the PCT or a different, shorter trail, straight into Olallie Lake. Not wanting to repeat, we opted for the shorter version which took us pretty fast back down to the lakeshore. This time, we clear blue skies, we did enjoy the views of the lake, Olallie Butte and the rare appearance of Mt Jefferson behind a ridge. It was indeed a very relaxing trip were we stretched something we could have hiked in one day and made it a three-day backpack!


You can see the rest of the pictures here

Interactive map

To see the full map, click here

Tattosh Peak, Aug 20th

I’ve got to admit, this hike was not even in my radar and I ended up doing it because I hadn’t planned anything and Steve, one of the hike leader in the group, had posted it. From the description it looked interesting so why not. And I think I have to disclose that they only bad thing about this hike is that is far. The drive from Portland is about three hours. In the end, you are hiking in the south side of Mt Rainier. Getting there is easy even though we did pass some shady campsites – read hunters, but once at the trailhead we felt a bit more secure. The hike gets in the forest right away and it’s pretty covered. Not only that, but it also takes very little time until you hit the first of a series of switchbacks that will make you gain some good elevation. But then, between the trees you get a glimpse of what’s coming ahead. The trail follows the northern side of a valley without getting all the way to the ridge. Looking at the map you can see many small creeks that start below the trail which made me think that the trail was build thee just to avoid the creeks. The climbing goes pretty steady until you get close to a saddle where a side trail would take you to Tatoosh Lake. We did see several backpackers heading that way for the weekend and our original plan was, depending on the group and time, to check the lakes out on our way down. We didn’t have that chance so there’s something to explore next time. After passing the junction though the trail opened up and was very exposed. We had to lather up with sun screen several times so we wouldn’t fry under the sun. The entire side of the mountain was covered in grasses and low plants that must have looked amazing earlier in the season when they were in full bloom. AS you continue to gain elevation, rolling hills appear to the west. At one particular point I stopped and turned around and almost fell back with the view. In most hikes we concentrate on the views ahead of us. This hike, the views are behind you (at least when you are going up). From different point of the trail you could see the entire path and Mt Rainier peeking above the ridgeline. The trail then turns east again to traverse another small valley with some impressive rock formation and some pretty steep cliffs. Below you could see the streams and creeks that have probably eroded the land forming the valleys. After a third valley we finally found the junction to the viewpoint that climbs quickly to the ridge line and leaves the tree line behind. Once you reach the ridgeline, Mt Rainier disappears for a moment but you get the valley of the Muddy Fork drainage and all the hills and mountains to the east and south. Way in the distance, almost hiding in plain sight, was Mt Hood. At this point, unless you were looking close down, you could not see the trail as it was obscured by grasses and pasqueflowers. Finally, you reach the summit and wow, what a view. The mountain just drops off in front of you with a rocky valley below and a seasonal tarn. Beyond that a mountain ridge and the towering Mt Rainier. Simply spectacular views. WE stopped there for lunch and pictures and then headed back down following the same path. When we reached the junction to the lake, the consensus vote was not to go there so we just continued down to the cars. The lakes remain to be seen.

You can see the rest of the pictures here

Interactive map

To see the full map, click here

South Sister, Aug 13 – 14

Sometimes plans change and the result is spectacular – I believe this would be the best way to describe it. Our original plan was to climb Mt Adams with a small group of friends, but then we started monitoring the weather as the closer we got, the uglier it seemed it was going to be. Finally, we decided to pull the plug on that idea. Val then suggested South Sister which, as it happens, was also on my to-do list. So we quickly came out with a plan and a small group and headed down Saturday morning for a two-day adventure.

Day 1: Green Lakes trailhead to Moraine Lake.

I had read that a lot of people that climb South Sister, camp at Devil’s Lake and then start early in the morning and go up just for the day. Those same reports talk about being very crowded making it even difficult to find an available campsite. Reading multiple reports and ideas, we decided to start from the Green Lakes trailhead but, instead of heading to Green Lakes, which can also get very crowded head to Moraine Lake. Not only the hike is shorter but it also puts you much closer to the climbing trail so it was a far better choice. Considering all that, we drove early in the morning and met the rest of the group at around noon to start hiking. The first half of the trail follows the beautiful Fall Creek as it makes its turns in the forest. The views here are limited to the creek itself and numerous short waterfalls. This is pretty much constant until you reach the junction with the Moraine Lake and leave the Green Lakes trail. At that point, the creek is left behind and you start gaining elevation. Pretty soon there’s a dramatic change in scenery but not because you start seeing the top of the mountains over the horizon. It’s because the trial passes a small saddle in the lava fields. As you get closer, the vegetation thins out and then you find yourself in front of big pile of rocks. Some of them look to be in a pretty precarious position as if almost a gust of wind could take them down.

On the other side, a couple of ups and downs separate you from the destination which appears as surprise after a turn on the trail. From that point you start seeing campsites already occupied so it’s time to start looking. Right when we got to the lake, to a junction that splits the trail to go on either side of the lake we met with the forest ranger. Talking to him we learned that the sites were limited and the we needed to stay in a designated site – unless we wanted to be asked to move and even fined. But, he was kind enough to point out that taking the trail on the other side and following the closed canyon trail, we would find the last three campsites probably empty as not too many people know about those. So with this recommendation, we headed that way. We did pass two or three already occupied campsites but after that, we found the remaining three, all empty. After waling back and forth two or three times, we picked the one we liked most and set up camp. Being early in the afternoon, we took our time to get water, relax and have dinner while admiring the limited views we had of South Sister.

Day 2: South Sister summit and out

On Sunday, we made a point to wake up early and hit the trail no later than 7:00 AM. With Val we woke up before 6 and had breakfast while we packed everything we didn’t need to leave in the tent. Then we hit the trail towards the lake. Behind us the sun was starting to come up illuminating the side of the mountain. It was looking like it was going to be a good day.
On the other side of the lake we took the Moraine Lake trail that steeply climbed over the ridge and met with the climber’s trail. Turning around at that point gave us a pretty spectacular view of the lake below us and Broken Top in the distance.


The trail itself was wide and easy to follow, in fact, it almost looked like a highway, but after passing a large flat area the fun began. Slowly at first but faster later, the trail got steeper, narrower and rockier. The views ahead of us were limited to the false summit but behind us the expanded to lava fields and other peaks. We huffed and puffed until we reached the false summit which comes as a surprise. From it, the true summit, or the south side of it shows up, but you also get a view of Lewis Glacier and a small seasonal tarn in a small valley.
Pretty much everyone stops there to catch their breaths and eat something so it was prey crowded when we got there. As everyone else, we took a very short break to grab a bar and then continue on the ridge to the final push to the summit. At that point the trail changed colors from the normal grey to red. Several switch backs later finally got us to the top. And I say the top because again, is not the actual summit. But, at this point things get just magical. When you reach this point, you are at the south end of the snow covered lake in the mountains crater. A trail goes around it and you can see the rock outcrop that is the actual summit on the east side of the rim. We started walking around the rim passing several wind shelters and then, just before you reach the rock outcrop, the views to the north start to open up in front of you. At that point it’s one of those instances that you can see almost everything but know it will get even better if you just walk a bit more. And it does. WE skipped the summit and continued to the very north end of the rim to a small rock shelter. From the point the views to the north are just incredible as you can’t even count how many peaks become clearly visible. Just looking at Middle Sister and North Sister at an arm’s reach and Chambers Lakes in the valet below is incredible enough, but when you add Mt Jefferson, Mt Hood and Mt Adams to the north it becomes just incredible.


We stayed there for a while having lunch and enjoying the views until the wind started taking a toll on our core temperature. On the way back we made a quick stop at the summit you to make sure we stood there or at least touched it. AS we hiked down, the clouds started moving in and the sky turned from blue to grey. The views were still pretty spectacular and once we got down to the lake, most of the clouds were already gone. That gave us one last good view of Moraine Lake and South Sister. From there we just went to camp, packed everything and hiked the short path back to the trailhead to head back home. WE spent most of the drive back in silence just re-living the scenery.

You can see the rest of the pictures here

Interactive map

To see the full map, click here

Huffman Peak, Aug 6th

I’m still asking myself why did it take me so long to go back to Huffman Peak. The first time I tried this loop was about 6 years ago and we found, really fast, the March was probably too early in the year. Back then the weather was less than perfect, there was considerable snow and the clouds covered most of the limited views from the trail. More importantly though, we were not able to find the actual summit. In contrast, this time was the right time to do it. I had seen some pictures from a friend on Facebook who gave me a couple of important details to reach the summit. So with all that in hand, we headed out to Siouxon Creek to start our hike. Instead of heading down and east along the creek. This loop starts going uphill towards the west but just for a little bit. As soon as you find an intersection the trail goes quickly down towards Siouxon Creek meandering thru some pretty big trees. While I hanged in the back of the group it was almost like watching a trail of ants walking around standing toothpicks. Soon and still fresh, we got to the creek which we knew we had to cross. With the recent low water and snow years we’ve had, Siouxon was running extremely low so for a moment we considered the possibility of using rocks to cross. After a couple of minutes, we realized that it wouldn’t be easy to that given the width of the creek. So with a bit of reluctance, we took our shoes off and waded the creek to the other side where we got our shoes back on and started the hard part of the hike. One of the main descriptors for this hike is that it pretty much goes up. Even though most of the trail follows a ridgeline towards the summit, views are very limited. There is only a spot or two where you can see the Siouxon drainage to the southeast but nothing more. After several hours of huffing and puffing we finally got to a saddle just before the trail makes a turn and goes around the north side of the summit. We looked for a marked path towards the summit but only found what looked like an animal path. So just before the trail started to descend again, we veered off trail and tried to keep in the ridgeline towards the summit. At that point, the going got slow. On one side, the path was not easy to follow, but on the other, most of the mountainside was covered in bear grass that gets really slippery when you step on it. Aside from dealing with that, we had to find our way around and thru multiple low pines with dry branches that acted as little hands grabbing onto our gear and clothes. Yes, we did get our good share of scratches before we finally got out of the dense vegetation to an open slope. At that point we started getting the good views. Even though there was a bit of haze, Mt Hood was showing its face out in the distance. Ahead of us we saw a good approach to a rocky outcrop that seemed to be the summit. Once we got there and made the final push, we reached a rocky ridge and that’s when we got out rewards, first with an incredible view of Mt St Helens, and then, a bit further up, Mt Adams.


We traversed the top to the eastern end where remains of an old fire tower are still visible and stopped there for lunch. After a need rest and being fried with the intense sun, we continued on the ridge and found a much easier way down back to the Huffman Peak trail. At that point we were back in the forest making our way to the Wildcat Mountain trail which we took going down. We did the necessary stop at Wildcat falls, both from the viewpoint on top of it and also from the trail as it passes next to it. Even though I took a couple of pictures, I had to make a mental note that I need to go back there to take some more serious pictures… on of these days. Back at Siouxon Creek we had several options to go back. WE chose the shortest which pretty much meant crossing the creek right there and then doing a little bushwhack back to the Siouxon trail. The hike from that point back to the car was very relaxing as the sun started to move away from the ridge and the colors in the forest started to change to intense oranges. It was an intense workout but the rewards make out for it.

You can see the rest of the pictures here

Interactive map

To see the full map, click here

Cooper Spur, Jul 24th

High elevation and up close personal views of Mt Hood, reason enough to do Cooper Spur. The other reason is that this hike is great for training purposes when you are planning on climbing a mountain. Not only it gives you the steep, exposed experience but also gives you the high elevation one as it starts at 6000 feet and goes to about 9000 feet. Since Val and I had our aims set on climbing Mt Adams towards the end of the month or beginning of August Cooper Spur was a perfect choice. We were also super lucky with the weather as we got a crystal clear day that gave us some incredible views. As we did last time, instead of taking the normal trail, we took a user trail that is becoming more official as time goes by. This trail climbs quickly to the ridge line just south of the Elliot Glacier run off. This route opens up views of the mountain and an incredible canyon as well as a clear view of the route to follow. From the ridge we noticed that some of the switchbacks on the face of the mountain were still covered in snow so some of the climb was straight up instead of the normal switchbacks. Still, we kept our steady pace until we connected with the actual trail and continued pretty much straight up to the signed rock which, seemed we reached much faster than expected. Last time we hiked this route we got to the first wind shelter and then turned around. This time, we less snow on the ridge, we continued up and were able to reach the upper wind shelter were we stopped for lunch while admiring the views of the crevices on Eliot Glacier that were almost at arm’s length. After the necessary rest and just before the wind started cooling us beyond what was comfortable, we started our hike down following the normal route passing by the shelter and then entering the forest to finish back at the trailhead. So we got our training and the rewards that come with it.

You can see the rest of the pictures here

Interactive map

To see the full map, click here

Rudolph Spur, Jul 16th

Wanting to go for a harder hike, Val and I picked the Rudolph Spur in the Gorge. On one side it had been quite some time since we did it last and on the other, I had been mentioning the last month or so. Also, we wanted something closer so we wouldn’t have to wake up super early and rush out the door. So we drove to Bridge of the Gods and had to do a couple of turns to find a parking spot. As it has become the norm, parking areas are now full so you need to be creative and sometimes park in places where you’re not sure if you’ll get a ticket or not. So with our fingers crossed, we crossed the street and got on the PCT. The first part, as you gain elevation in a couple of gentle switchbacks is a good warmup until you reach the power lines and then head east towards Dry Creek Falls. Right before the spur trail we found our turn and from there we could see lots of people heading to the fall. Trying to be inconspicuous, we made a quick turn and quickly tried to disappear thru the bushes. Right there we noticed that there seems to be less traffic on Rudolph spur. The trail has always been kind of hidden but has clear marks of adventurous hikers that take this route. We also started seeing newer fallen trees that were not there the last time we did this hike. The going was hard as we had to negotiate branches and rocks. We lost the trail a couple of times and were able to find it again. AS you gain elevation, there’s a known area where the hill gets very steep on the side and towards the end, the trail seems to disappear. At that point an old fallen tree serves as a handrail to climb and continue a bit higher but here’s where things got different. The tree, after many years of rain and sun, is finally decaying so grabbing onto it is not a good idea. The other thing we found is that the foot path that used to be there at the top is no longer there. There’s signs of a small washout that seems took the path down, We found an alternate path around a tree that was very sketchy but were able to negotiate and get to a fairly decent viewpoint before the path made a turn and headed back into the forest. From there, the ridge was easy to find and follow for the most part. The hard part was multiple new downs trees crisscrossing the trail. The progress was slow and at some point we lost the trail again. I noticed quickly enough and corrected just a couple hundred feet below a big clearing that serves as a great lunch spot with great views of the Columbia. In the past we have found groups of people here enjoying the views before continuing on. To our surprise, the area is now almost uninviting. Three trees feel across blocking pretty much the entire area where we used to sit and enjoy the view. Now, the only way to see anything is climbing around a knob of rocks and standing there. Otherwise, you see branches. Unfortunately, this is a trail that is marked as not maintained, so the likelihood of having a work party go up there with tools to clean it up is almost none existent. After a short break, we continued up negotiating even more downed trees as we gained more elevation until we reached Benson Plateau. I remember a faint trail that was somewhat easy to follow to get back on the Ruckel Creek trail. Either we missed it or buried under fallen trees and branches. Finding your way up there is always a challenge, the added branches and trunks, made it eerie.
It felt like being in a haunted forest for a while. Navigating our way around, we finally found our trail for the return path. At first we started going down fast as the trail is pretty steep and sometimes is just easier to let yourself fly down. But after a while the pounding took its toll. Both Val and I started feeling our knees as we pounded our way on a rocky trail all the way back down to trail 400. Normally the hike down is the easy part, not this time. It was as hard as the climbing so when we got down we had just enough energy left to hike back to the car. It was a bit sad to see the trail disappearing, but I guess that’s what happens when the trail is not maintained, the forest just takes it back.


You can see the rest of the pictures here

Interactive map

To see the full map, click here

Twin Lakes and Palmateer Point from Barlow Pass, Jul 10th

It was a rainy and overcast day so I didn’t plan anything with the group, but I still wanted to hit the trail. Since I hadn’t made plans, I had to pick a route I already knew so I started looking at some obvious choices in Mt Hood. Then I realized that it has been a long time I haven’t hike from Barlow Pass in a long time. This mostly because we use that railhead when there’s snow. It’s rare when we go in the summer. One option was to do the off trail to Ghost Ridge but I knew there were going to be no views from up there so instead, I opted to hike the PCT down to Lower Twin Lakes and then make my way around massing by Upper Twin Lakes and Palmateer Point. I got to an empty trailhead where I only saw another car. Once on the trail, under a faint mist I hiked in complete solitude and silence. I couldn’t hear birds, wind or water. It was quite peaceful. The ground was humid and had that recognizable wet smell. AS expected, I didn’t get any views to I just hiked on until I found the junction to the Lower Twin Lakes. When I got there, I had the choice to just check it out and continue on but instead, decided to walk around the lake, just for the fun of it. The views all around were the same. A very opaque and muted green surface and grey skies. I noticed the water level much lower than what it should be and a lot of erosion in different areas. One particular place that was completely flattened out was near the junction with the rog Lake trail. In that area, a rope was hanging from the tree and the clear marks of many people swinging on it to land on the lake. Can’t imagine how that would have looked on a busy weekend. After that, I continued on the trail towards Upper Twin Lakes, o that section I saw the only person I saw the entire day, another solitary hiker. I got to the second lake and though about going around. Instead I stopped, grabbed something to it and then continued around until I got to the Palmateer cutoff. One advantage of hiking this in the summer is that you can actually see the trail and don’t have to guess as you navigate on snow. The trail to Palmateer Point was easy to follow just until the point you get to the bare top. There are several foot paths going up thee so it’s difficult to see which one is the official one. Trying to to leave a mark, I picked the rockiest one and made certain to step only on hard surfaces. There were a lot of marks of less carful hikers though. At the top I didn’t get the welcoming view of Mt Hood, but I knew where it was. I didn’t stay there long so then I found my way down taking a connector trail to the PCY and back to the trailhead.

You can see the rest of the pictures here

Interactive map

To see the full map, click here

Diamond Peak wilderness loop, Jul 2nd to Jul 4th.

Long weekends are almost certainly a backpacking weekend and the 4th of July weekend, marking the “official” beginning of the summer is a sure one. We looked at three or four options that, after doing research we found that they were not doable. Either roads were closed or trails were not maintained. Looking further south, we picked the Diamond Peak wilderness which had been in the to-do list for quite some time. From the ranger station we learned that there was a possibility to find some downed trees in some of the trails but that they were hard at work trying to get the trails clear for the weekend. What they failed to inform us was about the other issue, snow. Read on.


Day 1: Diamond Peak North trailhead to Marie Lake

As we normally do, we drove Friday night after dropping the cats off to the trailhead. Being a long drive, we got there in the middle of the night and notice that the rest of the group were already there and probably sleeping. On Saturday we woke up early in the morning and as soon as we got out of the car we started swatting mosquitoes. With the other hand we managed to get dressed, have breakfast and get ready to hit the trail. The first part of the trail was a quick climb thru the forest with quite a bit of underbrush and downed trees. We started doubting the reports we got about the trails being clean very quickly. We passed the junction where we would come out on our return and headed south skirting the mountain. Along the way we passed several trail junctions to the many lakes you can access from this trail or from the road. Near the junction with Corrigan Lake was when we got our first grand view. In the distance we could see multiple ridges and Mount Thielsen in the distance.


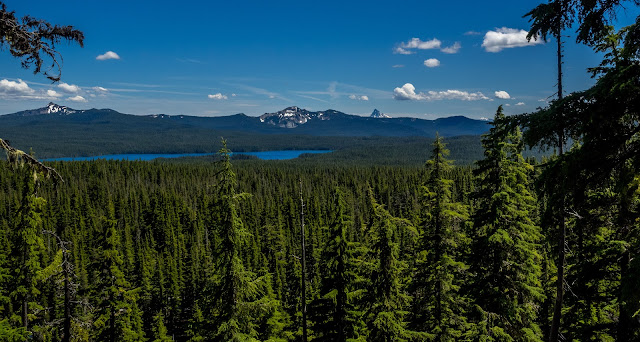
At that point the trip started to get real promising. Further on the trail we crossed Emigrant Creek that comes out of Marie Lake, our intended destination and finally got to the junction with the Rockpile trail. A bit more elevation gain took us by the Diamond Rockpile where we got another amazing view that now included a big mass of water that we think was Summit Lake. The trail ended up at a T junction that gives access to Rockpile lake to one side and Marie Lake to the other. Completely unexpected to us, there was some snow patches on the ground. Following our plan, we found our way to Marie Lake navigating over small snow patches that covered the trail. Then, finally, thru the trees we saw our destination and even better, as soon as we got to the lake we saw nobody else and a big campsite on the eastern edge of the lake. We dropped our packs and walked around just enough to confirm this spot was it. Being mid afternoon, we set up camp and then relaxed, some of us wetting our feet in the cold water of a creek that feeds the lake while others getting in the lake itself which was pretty shallow.


Later that day, and trying to stay away from the mosquitoes I went for a walk around the lake. That ok me over a ridge on the North side that gave some glimpses of Diamond Peak. I found a meadow that almost looked like you could get here on a 4x4. I got some nice water colors from the north side of the lake and was able to see a lot of snow patches. On the western end of the lake I found another large campsite. It was god but far less breezy that where we stayed so the mosquitoes where even worse (if there’s such a thing). Finally, I made my way back to camp to relax, eat and go to sleep.

Day 2: Marie Lake to a meadow plus Diamond Peak Summit attempt

We woke to a spectacular day even though we didn’t get the morning sun until later. After eating breakfast and packing, again with one hand as the other was busy swatting mosquitoes, we took off going back to the T junction. After the junction, we passed a meadow with a shallow pond we thought was Rockpile lake, but then, looking at a map, we realized it was just snow melt. We had to take a small detour to avoid having to walk thru the water and shortly after that, we found the junction with the PCT which would be our route for most of the day. We thought that would make travelling easier as it is the PCT after all, right? Well, not quite, but we’ll get to that. The PCT took as higher on the south flank of Diamond Peak and at a certain point we made a hairpin turn and got to a rocky outcrop with probably the views you can get from this trail.


From this viewpoint We could see Summit lake, Mount Thielsen and several other peaks further south that I can’t identify. We spent several minutes taking pictures there before continuing on. After that turn though, it was time to start looking for any mark that would indicate or lead to the access route to climb Diamond Peak. We found it pretty easy marked with two small cairns on either side. At this point, some of us dropped our packs and headed up while others decided to stay on the trail, take it slow and relax. There’s no actual trail that goes to the summit but it’s pretty clear what path you need to take. Most of the route is rocky screw so you can only go so fast. The other thing about this climb, that is quite distracting, is the views. Each step you take makes the views better. The valley below increases, the lake becomes larger and more features appear in the distance. As it happens with most mountain climbs you think you are getting to the top and then you realize there’s a false summit. This was no different, but, we were welcomed with a huge snowfield with an edge that looked like a wave.

From that point we could see that the entire eastern flank of the mountain was white while the western side was not. We should have taken that as a clue of what we would find later along the PCT…. From the false summit, we could see the real summit not too far away along a ridge. We negotiated the ridge as far as we were able to but found a point that would have been really sketchy to pass. There was a big chasm on the side you needed to descend to and the traverse the side of the snow field to get back on the ridge. We contemplated the idea for a couple of minutes and then decided to head back down.


That adventure took as a lot longer than what we had estimated for the distance and elevation gain, but, considering the long day hours, we were not worried about the rest of the day to get to our next destination. So we ate something, got our packs and continued on the PCT. If you look at the map of the area, you’ll notice that the PCT skirts the eastern flank of the mountain right above the tree line. Remember I said that from the false summit we could see it was white? Well, it didn’t take long for us to find sections of the trail under snow.
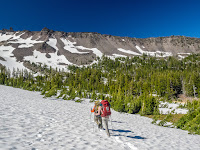
Without traction devices, the going got slow. Not only we had to navigate and find our way, we had to negotiate slippery slopes, trees, pot holes and mosquitoes. Needless to say the going was slow and arduous and nobody had happy faces. It was a totally unexpected situation, but we pushed. At around quarter to 6 we made a stop to eat and replenish fluids. Legs were sore and spirit was low. From the map, it looked like we still had a long way to go, more that we had done so far (not counting the climb to Diamond Peak). We continued on trying to keep a steady pace. We all took chances at falling down, hitting a body part with a tree or landing in a pot hole. It didn’t get any easier and by 7 PM we knew there was no way we would be able to continue to our next destination or even navigate the snow safely, so at that point we started to look for a place to camp. Luckily for us, we pass a small snow melt creek and a bit further found a small meadow. It wasn’t perfect but flat enough to set up camp. As we did, the wind picked up and it got colder pretty quick. Almost in silence we all had dinner and hit the sack. The only thing we decided before that, was to wake up early in the morning and hit the trail no later than 8AM as we had to make up the last section of the PCT and then hike out.

Day 3: Meadow to Diamond Peak North trailhead.

We started with good energy and the hope that we would be out of the snow quickly. With the cold temperatures overnight, the snow had solidified so it helped to move a bit faster on the morning even though it was a bit more slippery. Finding the trail was also a bit easier as we were rested and with clear minds. Within an hour or so, the snow started thinning out as we passed by several snow melt ponds. The trail was also getting back in to the forest which would help a bit. AS we continued we found snow only on the uncovered areas of the trail. Anything that was under the canopy, was mostly free of snow and easy to walk on. Then, finally, we got o the junction with the Mount Yoran trail that would take us to the western side of the mountain and probably out of the snow, and it did. As we started descending towards Divide Lake (the intended destination for our second night) we passed a couple of shallow snow fields and lost the trail a couple of times but got down to the lake pretty quick.


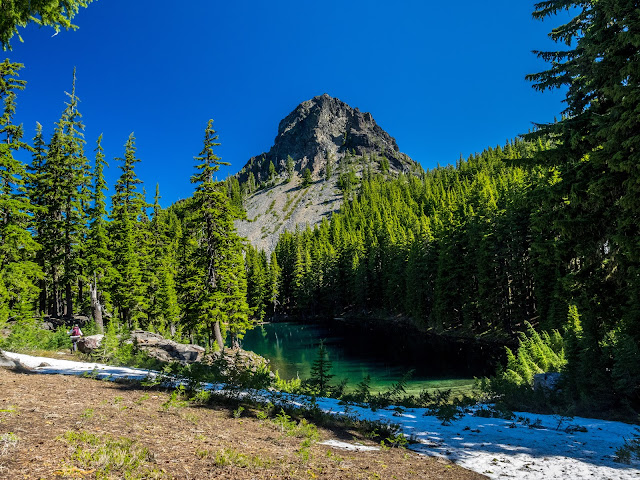
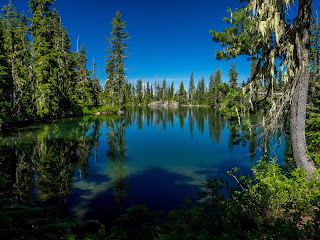
Looking at the time, we realized it took two hours from where we stayed to the lake, something we could have not make the day before. The other relief was that we knew how long was the route from there to the trailhead and that most of it was downhill. Now that doesn’t necessarily mean easier as we found a lot of blow down on the way, but the going went better. It was a pity we didn’t get to spend the night at Divide Lake as planned. The lake itself and Mount Yoran right next to it offer some really amazing scenery. It looked like we were in a complete different place as we didn’t have those valley views or distant peaks. The we marched on, half of the way staying on a ridge line that had several unfrosted areas with views of Diamond Peak. At the end of the ridge, we passed a knob and then started descending quite rapidly to the valley. As we did, it got hotter and the mosquitoes even worse. It was hard to hike with poles while swatting mosquitoes. We had already used most of the Deet and jungle juice we had (not that it was helping). After a while hiking in the forest we came out to deep blue lake that market the bottom of the Yoran Mountain trail. Notch Lake is really beautiful although, being at lower elevation, had muddy shores and more mosquitoes.
We continued around a small section of the lake before leaving it behind as we approached the tie trail that would take us back to the Diamond Peak trail and then down to our trailhead. WE passed a couple of pond on the way that we didn’t stop to admire as by that point we were done with mosquitoes and branches on the ground. It was again a bit grueling but we were in better spirits as we were closing the loop. The tie trail ended up being easy to navigate although even less used that the other trails. Eventually we got to our junction, turned right and headed down to our cars. Despite the hard work navigating thru snow and having to stay on that meadow, this was a spectacular trip with some really amazing views.


You can see the rest of the pictures here

Interactive map

To see the full map, click here

Wauna Point, Jun 26th

I believe I’ve done this hike a couple of times in the past. The first time, if memory serves me well, we got to the junction with the unofficial path to the viewpoint but didn’t go there. Then, back in December of 2014 we hiked up there with our fried Erin on a very cloudy, misty day – it was December after all. We did get all the way to the view point but with all the clouds and rain, we didn’t get many views. Not saying it was not a spectacular hike that time though. Watching the clouds as the crawl up the mountain side over the trees is always a nice site. From the viewpoint, things were a bit different as there was only a grey void. It looked like this.

This time, Val and I did the hike on a warm, sunny day without a single cloud on the sky. I didn’t take a lot of pictures because most of the hike is very forested and steep so you’re huffing and puffing your way up the mountain. There are only a couple of spots where you can see the Columbia River and Mt Adams on the other side. Then we took the trail that goes to the view point and started getting hints of the reward we would get. I remember a section where the trail descends on a saddle to go over a second know before descending a bit to the viewpoint. Back in December of 2014, with the clouds, the knob looked like a mysterious island in the sky. This time the view might not have been as magical but still cool.

Then we hiked down on a very narrow user path to the very end of the ridge where a very stop drop off would make very bad news. The difference is that this time we finally, finally! Got the spectacular views and the reward for the almost 3500’ of elevation gain. Yes, the hike is long and has a lot of elevation gain but oh man is it worth it. 


You can see the rest of the pictures here

Interactive map

To see the full map, click here

Elk Mountain – Elk Creek loop. Jun 12th

Whenever Val and I need to get out and do a training hike, Elk is one of the hikes that comes in the list. Part of it is because it’s a short drive from home and doesn’t require, for us, to cross the city and it doesn’t get as crowded (yet) as other hikes in the Gorge. The other is because, even though it’s not that long, it has a section with good steep elevation gain. This hike is one of those that you don’t get to warm up. AS soon as you hit the trailhead, it starts going up, quickly. The advantage is that it doesn’t take long to get to a very descent viewpoint. On this particular day, we know we would good views as the sky looked clear towards the ocean. As we gained elevation the views got better and the weather hotter. Along the way we saw wildflowers in bloom which is always an extra treat. We reached the summit pretty fast and got a real nice view of the coast and a darker blue line that could be the ocean, or maybe not, you be the judge.
From there the trail becomes a roller-coaster of ups and downs as it travels on the ridge. It’s interesting that this hike passes over the Elk summit yet there are points on the ridge that are higher than Elk. It’s very weird. IN any case, right after the highest point, the trail descends to an old forest road and a junction. We wanted to make a stop there for lunch but the sun was beating on us so we continued on the road towards Elk Creek until we found a shaded spot to sit and have lunch. From there we continued on the shaded road for quite a while passing a fork that leads to the creek. At you continue, the road starts to thin out until it actually disappears and you are left on a trail. I guess not too many people take this route as the bushes are pretty high in places. There’s no good views of the creek but at least it offers a relief from the sun as heat until you get all the way down back to the parking lot.


You can see the rest of the pictures here

Interactive map

To see the full map, click here

Neahkahnie Mountain, Jun 4th

Neahkahnie is one of those places that has some interesting history. It’s a small peak along the Oregon Coast that offer magnificent views of Manzanita from its accessible summit. The name, as far as I know, comes from the Tillamook language meaning “The Place of the God”. Just with that, you can imagine there are some stories there. More recent stories though mention a treasure buried somewhere in the mountain. Artifacts have been found but no treasure. Being part of a state park prohibits excavations so no more treasure hunting unless you are looking for the view from the top. Hiking has several options. There are two trails that go to the summit, one from Hwy 101 on the west side and the other from the Neahkahnie trailhead road on the south side. Both are about the same distance but the first has the option of adding a trail on the 3eother side of the highway to get a bit more distance (it also is the better known approach for this hike). Starting from the day parking area in Oswald State Park, you head down towards the beach. IN the park, there are multiple trails that go different places which can be a bit disorienting at first. The easiest way is to head south until eventually you reach a hanging bridge over the Necarney Creek. At that point you are officially on the Oregon Coast trail. From there, the trail quickly gains elevation traversing a very lush forest with some pretty huge trees and fern covered grounds. After the first switchback, you find, at least for me, one of the interesting points of this hike. There’s a huge tree that from the distance looks like a Brachiosaurus crossing the trail.
The roots are so immense that look like legs while the trunk looks like the long neck that goes up to a head you can’t even see. As you get closer, you realize it’s in the middle of the trail so you get to pick whether you want to walk around the front of the “legs” or under its belly. Passing that, and taking the obligatory pictures, the trail continues up until it plateaus. The forest changes to something completely different. It’s still very shaded but no more tall trees. At points it’s kind of eerie and you feel like a deer will jump out of nowhere at any time. But then, you come to the last tree and come out to the open to find an open field that extends to a drop down to the ocean. You can recognize the spot even if you are not looking as the temperature rises several degrees as you walk out of the forest. At the other end of the meadow, you can see the Devil’s Cauldron viewpoint, a rock outcrop that overlooks the ocean and a small bay where waves crash into rocks. Along the trail there’s an unmarked junction to head to the view point. It’s worth taking the time to go there and check it out, it won’t disappoint. Once back on the trail you head east and end at a trailhead along Hwy 101. On the other side of the road a small trail sign marks the beginning of the Neahkahnie Mountain trail. So cross with care and start climbing. As you gain elevation you pass low vegetation and heat before entering into the forest. It’s usually hot up there. From about half way up, when you enter the forest though, views pretty much disappear until you are very near the top. You notice when you’re close as the bare rocks loom on your left. There are multiple footpaths that people take to scramble to the top from this side but the trail actually goes around and comes back up from the east side, a much easier approach and less damaging to the vegetation. Once there, the big reward. The views of Manzanita are just incredible. Returning is easy enough as you just retrace your steps all the way to the parking lot. There’s of course the option to make a quick stop at the beach though.

You can check the pictures here

Interactive map

To see the full map, click here

Alpe di Siusi, May 26th

For our last hiking day in Val Gardena, Val and I picked a shorter and easier loop on the other side of the valley. Looking at the maps, Alpe di Siusi seemed to fit what we wanted, the only thig was that we needed to hop on a lift to get up there. Once at the station, we considered our options to come back down which included taken one of the several trail or, ride the lift back down. At the station we learned that they do this intelligently. If you buy the round trip, it’s cheaper than getting a single leg, so buying only the way up and then deciding whether we wanted to take the lift down, would have cost us much more. With that, we just got a pair of round trip tickets and got on the little red gondola that would take us up. The ride was smooth and on the way we got really nice view of the city. Towards the top we could see clearly the entire Resciesa Ridge that we had hiked the previous day. Once we got off the Gondola, we walked to a completely different scenery. Certainly we had the huge peaks all around us, but just below we had an immense expanse of rolling meadows. It almost looked like a postcard. The first part of the loop started but going down the hill and passing several hotels and refugios marketed for winter sports even though several had summer activities as well. One of them had a petting farm with Lamas, Cows and Ponies while another had a pool. A lot of these places had even their own lifts so we guessed that in the winter, you just hope on, and sky around the area trying not to land in the lobby of one of these establishments. The hike was easy and picturesque with wildflowers on the ground and immense rocky peaks in the distance. It was certainly different from what we expected but beautiful none the less.

You can check the pictures here

Interactive map

To see the full map, click here


Resciesa Ridge, May 25th

After a couple of days with clouds in the sky and even some rain and snow, we finally got a clear day. From the forecast we knew this was probably going to be the best day during our stay in Ortisei so it was time to head out to do this loop. While planning for it, I had seen numerous pictures and descriptions indicating the ridge trail had spectacular views. I did start with some views in my head that I wanted to see but wasn’t sure if those were on this particular route. So after a hearty breakfast we walked out of the apartment where we stayed and started heading east. I must say that walking out the door and start hiking, whether on a trail or to it, makes a big change. Originally we thought we had to go down to town and then pick up the trail from there, but as we walked on the streets, we noticed little signs painted on walls indicating the trail. After a couple of turns, always going uphill, we finally found the trailhead and got into the forest. The trail at first was a bit different than what we expected. It was a very wide, rock covered path. Although I couldn’t find information to corroborate this, it seems a lot of the trails in the area are old cart routes that give access to little churches and refugios perched on the mountains. This is kind of corroborated by the frequent religious markings along the trail. As you follow the route, you pass by logs with carved images of different passages of the bible that seem to mark the trail and maybe even distance (although we didn’t see numbers). Most of the trail at lower elevation is a dense forest without a lot of views. There are some opening here and there that allow you to have a limited view of the valley below and the most prominent peaks on the other side, Sassolungo and Sassopiatto. As you gain elevation, the forest starts to thin out and at a certain point, the trail joins a dirt road. There you have the first really big view of the valley. While admiring the views though, you might hear a buzz to the side when the futuristic funicular zooms by taking tourist all the way to the top – the easy way. A couple of long switchbacks later, the trail comes out of the forest and you see the first refugio in the distance. AS you get closer, you start seeing people that took the easy way up having coffee and strudel or simply sunbathing while having a beer.
We didn’t make a stop at the refugio as that was not our intent so we continued on towards the edge of the ridge where we found a tiny church. At this point the views were simply breathtaking. On one side we could see the entire Val Gardena valley, on the other side of the valley was Alpe Suissi, our next hiking destination. To the east a clear view of the Sella Group and Seceda. To the west Ponte Gardena and more mountains. Around the church we found a big group of tourists that we quickly left behind as we climbed a bit more to Resciesa Dedora, the tip of the ridge whit a big wooden crucifix. From that point on, the trail would take us east heading towards the Ogle Group leaving tourists behind. The views only got better as we passed by one of the many places I had seen in pictures. AS you detailed the terrain, you can almost imagine the cataclysmic events that shape these mountains. Part of the terrain almost looks like it was flat at some point and a gigantic force lift it from one side making it look like it does today. As we walked, some puffy clouds started appearing giving more excitement to the scenery. Once we got to the junction with trail #9, a possible route to go back down, we stopped to eat lunch. Since the day was spectacular and we were enjoying the hike, instead of heading down, we opted for a longer route continuing east and take a different route down. The ridge was very enjoyable and the big Odle in front of us getting bigger and bigger as we got closer to it. Finally, we got to the junction with trail #5, the route we would take back down. From the junction there was a path down to Rifuguo Odle which we could see from above, and another trail that continue even further east. We took a last look at the path we had come from and could see out in the distance a little dot where the crucifix is. On our way down, we were accompanied by the incredible rock walls of Seceda painted in multiple colors. We had to jump off the trail a couple of times as mountain bikes came flying down the trail. I guess rules are a bit different and you are the one expected to get out of the trail. Finally, the trail become again an old dirt road that took us around some old houses and then the trailhead. We still had a bit over a mile to walk back home which was a bit tiring, but after enjoying a spectacular hike, we didn’t have much to complain about.


Interactive map

To see the full map, click here

Ortisei to Selva, May 24th

Val and I decided to divide our vacation trip to Italy in city and mountain so we spent the second part of our trip up in Val Gardena. Val Gardena is one of the main valleys in the South Tyrol region in northern Italy. It’s pretty close to the border with Austria so the architecture and even the language tends to resemble the Austrian side more than the Italian side. The area is well known for the multiple winter sport options going from the very easy to the very difficult. In the summer, the entire valley switches to hiking so all the trails and routes serve dual purposes. I must say though, that hiking in the area is more “touristy” than what we expected. Most guides encourage to take a tram or lift to the top of the mountain and then hike down passing thru numerous refugios where you can get some strudel and a beer… Yes, you can still due the harder hikes and climb if you want. There’s everything for everybody. In May things are bit unique which is something we knew but weren’t concerned about. May is the transition month where the entire valley goes from winter mode to summer mode. This means that most services are closed for the entire month. This includes some transportation, restaurants, lifts, etc. As expected, not too many people go this time of year for obvious reasons. That was a blessing for us. The caveat is that weather can change dramatically. Hey day we got there it was sunny and warm and beautiful. The following day it rained and it was cold. E even got a layer of snow not much higher than were we stayed. For our first hike we knew we would get good views from higher up and probably we would encounter snow. With that in mind, we picked several trails that connect Ortisei with Selva passing thru St Crisitina. We started straight out of the apartment where we stayed and walked all the way to the center of town in Ortisei enjoying the views and how living there must be like. We were pretty much drooling. Just east from the center of town we found signs pointing to the trail we wanted to get on and soon where climbing on a rocky path. The trails were clearly marked, wide and easy to follow (as most trails seem to be in the area). Across the valley clouds were moving in and out revealing the rocky faces of Sasso Lungo and Sasso Plato, the mountain range that would be in front of us for several days. From our side it was almost unreal how tall and close those peaks are. Eventually the trail levels out and passes the Sacun church, one of the many churches that give name to the trails or the areas. There we saw a group of kids that seemed came from a school and were spending the afternoon up in the mountain – what a life. From there we descended towards St Cristina and walk thru town. Most businesses were closed and we saw little activity. Again we found the trail to continue towards Selva and took it but soon enough found a sign indicating it was closed. Another couple came buy and decided to jump de fence and continue but we opted for the right thing to do and trace back to find and alternate way. We did see he couple again coming back and learned that the trail was being reconstructed and there was no way around on that side. We ended up connecting a bike route that eventually took us all the way to Selva which is a much smaller town but more touristy. There was a lot of construction and only one café opened. Everything else was closed for the month so we were relieved about our choice to stay in Ortisei. We walked around for a bit before and finally decided to walk in the café for a strudel and a cup of coffee. We had already walked a bit over 10 miles so it was very well deserved. Then we walked to the bus stop, hopped on and took a ride back to Ortisei to finish our first loop.


Interactive map

To see the full map, click here

Dog Augspurger loop, May 7th

Dog Mountain is one of those places that gets more popular every day. Part of it is because it’s so easy to get to and the other because, if you time it well, you get the most beautiful wildflower display you can find in the Gorge. The problem with popularity though is that it has become harder and harder to find a parking space at the trailhead along Hwy 14. Recently Washington authorities, realizing the problem, decided to limit the number of cars that can park in the parking area in an attempt to have people park at nearby Carson and take public transportation to the trailhead (which I believe doesn’t exist yet)> Knowing all that, Val and I decided to go there to check he flowers as reports where indicating they were spectacular. Getting there was easy but very quickly we realized the parking issue. Not only the parking area was full but there were cars parked at every single little pull out along Hwy 14 for about a mile before and after the trailhead. It was a freaking circus! We ended up finding a spot about three quarters of a mile from the trail head which, for us, is not much of an issue other than having to walk along the highway to the trailhead. Talk about a dangerous proposition when you have kids, dogs and everybody plus their grandparents walking along a highway. Once at the trailhead, we wanted to use the bathroom… a 20-minute wait to get there. After all, that ordeal, we though “well, at least we can know start hiking and get up there” well, with so many people going there, the trail is packed so you have to stick behind someone at some point in the hopes they might let you pass. A circus. Luckily for us though, we went with the intention of hiking the back route to complete the loop. Most people don’t do that route and prefer to do and out and back instead. That gave us a bit of relief and even solitude on the way down to then finish with a hot walk on the highway back to the car. The good thig though is that we did luck out with the flower display. Not only the mountain was covered in the seasonal yellow, it had multiple pockets of purple, pink and red that made it almost magical.


Interactive map

To see the full map, click here

Ramona Falls loop, Apr 16th

With Val traveling over the weekend, I decided to join Steve on his hike with the group to Ramona Falls. Not only it had been a long time but also, the previous time we went, the logs were still icy and not very safe from crossing over the Sandy River. Once at the trailhead, Steve decided to do the hike in reverse. Part of it was because he wanted to see if we could find a guard station that is supposed to be near the PCT after it leaves from the Ramon Falls trail. The hike ion the shady side of this loop was delightful as it always is. AS you hike and meander thru the forest, you are welcomed with multiple forest displays that include small creeks and waterfalls, mushrooms, rock walls. A little bit of everything. One of the unexpected things was that, as we got closer to the waterfall, temperature started dropping quite fast to the point of requiring an extra layer to keep warm. The waterfall was, as expected, magical. So we stayed there for a while grabbing a quick bite and taking multiple pictures. At some point I was taking pictures from a small slope on the side of the creek just under a bridge when I felt the peering eyes of something behind me. When I turned around I was surprised to see a raven standing over some logs watching me. I can say it was probably 3 or 4 feet away so it did look gigantic. I tried to get closer for a better picture but it took off. Thinking I had missed the opportunity, I started walking back when I heard the raven come back and land on the same spot. So I turned around and quietly turn the camera on and approached sideways as without interest. I was able to get to just a couple of feet away and take a picture before it left again. It was quite an imposing creature. After that, we grabbed our gear and started walking fast to regain some warmth until we got to the fork with the PCT. We hiked up the PCT for a while looking for signs that would indicate a foot path towards the guard station but didn’t find anything. We got as far as to the point where the PCT crosses the Sandy River before heading back down and resuming our loop towards he parking lot. ON the way back we found tons of people near the crossing area trying to get to the other side and further down, in the parking lot it looked like a circus. I guess it’s becoming common to find so many people on the trail these days


Interactive map

To see the full map, click here