Eagle Creek, Oct 8th

This hike, along with Multnomah Falls, is probably the best well known and most visited trail in the Gorge. Reasons are many, it offers multiple waterfalls along the way, it can be a short or a very long hike depending on how far you want to go and it’s relatively close to town. I’ve done this hike many times, to different destinations and even as an exit route from a backpacking loop. This time it was a jaunt to Tunnel Falls and back as Kim was training to become an assistant organizer in my group. We started on a very foggy morning that offered some great views of the canyon but limited possibilities for pictures. We also noted that the creek was running a bit lower than usual which left some waterfalls a bit less impressive than usual but equally pleasing. One thing’s for sure though, if you have a chance to do a single hike in this area, this should be high up in the list.


Interactive map To see the full map, click Menu and select Full Screen. You can also click Terrain to change the map style

Hamilton Mountain, Sep 17th

Hamilton Mountain is one of those classic hikes in the Gorge that gives you very nice views and a descent amount of exercise. It’s definitely a weird summit though. Most times, the word summit comes accompanied with 360 degree views which is not the case of Hamilton. This summit actually “point” to the east so you can only see that way. Better than the summit itself though, is the actual hike up there and the walk thru the saddle after the summit. Both of these offer great views of the Columbia River, Bonneville Dam and Mt Hood on the other side (only visible on clear days). This hike was like any other time I’ve done Hamilton in the fall. Great colors and amazing scenery. The only unexpected thing that threw me off a bit was finding a group of about 200 kids up at the saddle. I talked to one of the “leaders” and he told me it was a group from a Christian school that hiked all the way from the horse camp. Other than this “encounter”, the hike was very nice with a fun, small group of people.


Interactive map To see the full map, click Menu and select Full Screen. You can also click Terrain to change the map style

Trapper Creek, Sep 10th

With many things going on, I was about to post a hike on my own when Zach, one of the hike leaders in the group, posted a hike in Trapper Creek. Since he had been doing some really nice hikes that involved considerable distance and elevation gain and I needed a bit of exercise, I decided to join him instead. I’m not sure what was it but the day did not start very good. I guess I might have been a bit dehydrated which combined with the high temperature and humidity triggered a headache that left me walking almost by remote control. I was not happy. As if that was not enough, my well worn hiking shoes gave out and started bothering me. About half way thru the hike I opted for taking them of and hiking barefoot. That didn’t work well in the long run as I couldn’t find a god way to keep my socks and insoles in place (despite the duct tape) to protect my feet. At some point Val came to my rescue (thank you sweetie) and gave me her shoes which worked nicely for the rest of the hike while she wore mine. I guess the way I break shoes didn’t affect her at all… go figure. Anyway, despite all of the above, the hike was not terrible at all. The Trapper Creek wilderness is wonderful and incredibly beautiful forest with some old growth sections, many creeks and streams and some great scenery. It does offer some trails for backpacking adventures and explorations as many spur trails cross the area giving you more than a couple of options to reach different destinations. Zach’s choice was great as it gave us a good sample of all that and left the possibility open for future hikes in the area.


Interactive map To see the full map, click Menu and select Full Screen. You can also click Terrain to change the map style

Battle Ax, Sep 3rd

I did Battle Ax about three years ago and was fascinated with the views from the top as well as the wintery scenery on the back trail coming back down. For some time now, I had been thinking of re-doing this hike but stayed away from it as it requires a long drive for a not so long hike. For this weekend though, I had not planned anything with the group so, considering the good weather forecast, I took of with Val to do this great little hike. Views were as expected with the added bonus of being able to see the big smoke cloud hovering over Mt Hood due to the Dollar Lake fire which was, coincidentally, the place we visited two weeks before. Looking at it from the distance gave us mixed feeling. ON one side it looked incredible but on the other, it was hard to imagine the destruction it was coming from. This hike is still one of my favorites for some reason and being able to share it with Val was the icing on the cake.


Interactive map To see the full map, click Menu and select Full Screen. You can also click Terrain to change the map style

Table Rock and Rooster Rock, Aug 27th

This is a hike I did a long time ago but then, I was not able to get to Rooster Rock. Part of the reason was that we found considerable snow which made the hike a lot more difficult than expected. This time though, being the middle of the summer, not only we had spectacular weather but also time and energy to do it. The hike itself is not too hard although it certainly has more elevation gain than what the books say. The reason is that, between Table Rock and Rooster rock there’s a deep valley you have to descend to before climbing on the other side. The first part of the hike was pretty much as I remembered although this time, without snow on the ground, we were actually able to follow the trail. I remember last time we took a higher path thru the forest which made the rock traverse a bit more difficult but still doable. Views from the top of Table Rock included Jefferson and Hood with very faint views of other volcanic peaks. From there to Rooster Rock was a bit of a jaunt with a steep climb but we found it to be well worth it. I can certainly see why Table Rock has that name but for the life of me, I can’t see any resemblance in Rooster Rock to anything


Interactive map To see the full map, click Menu and select Full Screen. You can also click Terrain to change the map style

Dollar Lake and Barret Spur, Aug 20th

This area might not look like this anymore. A few weeks after I did this trip, a forest fire broke up and burned most of the area. Located in the north side of Mt Hood, this is one of those trails that offer a different perspective of the mountain. I can safely say that the first part of the hike, from the trailhead until you reach the Timberline Trail is like any other forest hike. You meander thru the woods with limited views, but this trail offers some nice streams and creeks that add to the beauty of the place. But then, just before you reach the Timberline trail and, in our case find our way thru mud, you get some interesting views of the cascade peaks to the north. Once on the Timberline Trail you have to look for a small cairn and a user trail to the right that climbs to Dollar Lake. Incredible enough, this is not an established trail despite the fact that a lot of people go that route, primarily to spend the night at the lake. From the Lake, that is located in a small basin, you don’t get a lot of views although you can clearly see the route you need to take if you pretend to climb to Barret Spur. After a short break and lunch we tackled that route with the intention to reach the saddle. That climb was arduous as it was hot and we were on an exposed trail. AS you gain elevation though, the views keep getting better and better. In the pictures you’ll also notice the dramatic change of scenery that goes from lush greens and valleys to rocky ridges and slopes. From the saddle we got an incredible view of the Ladd Glacier, Pulpit Rock and the top of the mountain. With the group, we decided to climb a bit more to the ridge to a higher point on Barret Spur. I had read you could go further than what we did but that would have been a bit dangerous. Still, from our return point we got some magnificent views of the Coe Glacier to the east and some amazing crevices down below. Indeed a hard hike but very rewarding with the views and scenery. For me it was even more rewarding. That’s the day I really noticed Val.


Interactive map To see the full map, click Menu and select Full Screen. You can also click Terrain to change the map style

Wallowas backpack, Aug 7th to Aug 11th

This is probably the best backpacking trip I’ve done so far. The combination of amazing scenery, beautiful lakes, incredible peaks and views, great friends and long distances traveled made this a memorable trip. The Wallowas, also known as the Oregon Alps, is a mountain range in the northeast corner of the Oregon State that are crisscrossed by multiple rivers and filled with lakes. Up there you can find multiple backpacking options that range from an easier three day trip to a multiday trip where you can pick and choose your route and campsites. For this trip, we opted for the most common loop with some added side adventures to get a good sense of the area. We thought it would be enough to know the Wallowas but after this trip, we realized we’ll have to go back and explore some of the other more remote options.

Day 1: Wallowa Lake Trailhead to Ice Lake

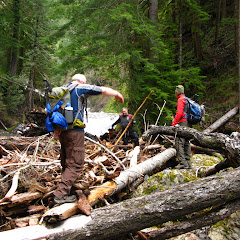
After a good night sleep and a great cowboy breakfast in Joseph, we drove to the trailhead on a wonderful and already warm day. We noticed a lot of cars parked in the area but not many backpackers so we couldn’t predict what we would find. We started our hike on a dusty trail that soon made a turn and gave us a view of the west fork of the Wallowa River which we would follow for most of the day. From that turn, we continued uneventfully thru dense forest with limited peak views in the distance. At around noon, we finally reached a meadow that gave us a better view of the canyon and the trail sign indicating our turn to Ice Lake. Looking at the map, we knew we had to cross the river so we followed the trail to a small campsite to find a fast moving river and no bridge. Just up from where the bridge was supposed to be, we found the reason for no bridge. A Big tree had taken it down but luckily created a big pile of logs that we could use to cross. Right after that, we found our first interesting view. The forest opened up to a small meadow with Craig Mountain right up ahead that also gave us an idea of the climb ahead of us


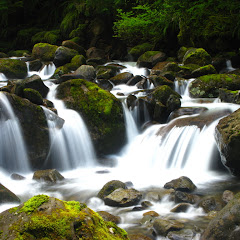
After the meadow, we got back in the forest and quickly started gaining elevation thru a series of switchbacks that eventually would lead us to Adam Creek. At that point we could still see the creek but the views behind us were outstanding as we could see the valley we just hiked thru. We continued on more switchbacks, this time under the inclement sun up to a second point where we did get a full view of the creek all the way up to the saddle. We knew this creek was the outlet of Ice Lake but what we were not expecting was to find a lot of waterfalls.


As we traversed and continued climbing, we passed by a spectacular waterfall were we took a mental note to come back later in the evening. On top of this waterfall, we found a big meadow with a new view of the range but no clear idea where we were going. We made numerous guesses as to where the lake would be and all were wrong. After traversing the meadow on the high side, we got back to the creek and more switchbacks, each offering a new perspective of Adam Creek and the Valley behind us. By then we knew that getting to the lake would be one of those surprise moments were you make a turn and voila! There it is. And certainly it was. We noticed that the trail forked to either side of the lake and opted for the left as it looked to be the trail to potential campsites. Right after crossing the outlet, we found a perfect site with room for our tents and my hammock. Being a bit early, Mark and I decided to hike back down to the waterfall to explore a bit more and take a couple of pictures. The sun had already moved bellow the ridgeline which shadowed the whole Adam Creek Valley while still illuminating the ridge on the other side of the Wallowa River valley. Before getting to the waterfall we wanted to go to, we took a short detour to an upper waterfall we had heard before. The fall was as beautiful as the other one as it had a small drop off at the top and then was showering down the rocks.


From that view, we found a faint trail that followed the creek down that eventually took us down to the main waterfall. We explored in the area for a while and took several pictures before heading back up to camp. As if the waterfall spectacle was not enough, as we were hiking up, the moon appeared over the ridgeline while there was still a streak of sun shining thru. We made it to camp with that image and ready for food and a well deserved night sleep.

Day 2: Matterhorn Climb

After the long hike with heavy packs to Ice Lake, we had decided to climb the Matterhorn and explore around on our second day. We started shortly after breakfast walking around Ice Lake to a small meadow and a trail going uphill on the other side. From there we could already see it was going to be a great day. On one side we had hills covered with wildflowers and red rocks, on the other, sporadic trees and up above, granite peaks. As we were going up, it was difficult to concentrate in one scenery as all were equally beautiful. We were also able to see behind us the whole lake and how it dropped to the valley right behind where our campsite was. Once we had gain sufficient elevation and were above tree line, the mountains became far more interesting. Some of the peaks were massive granite blocks while others were simple big rock piles. The combination of both gave the whole terrain some really interesting colors that ranged from white to dark red and brown. It was hard to imagine how all that held together.


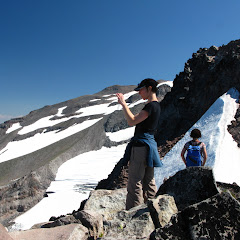
After climbing some more on the loose rock, we finally made it to the transition line to granite. I’ve seen granite before but like this that seemed to have flowed from somewhere or had been in liquid form. The side of the mountain had multiple shades that gave us the idea that all this mountain range was, at some point, under water. It still took us a while longer to get to a saddle between the Matterhorn and an adjacent peak. From this vantage point, we could see a steep drop off all the way down to the Hurricane Creek Valley on one side, and the valley behind us with its glaciated pools. From there, we climbed around until we reached the summit. From there, we could see the Hurricane Divide and all the peaks behind it as well as the Hurwal Divide. To the south the views we a bit less expansive as the ridgeline from the Matterhorn curves to that side with very tall and thin rock wall that looked more like a sail. Being almost noon, we decided to take our shoes off and have lunch up there. We noticed that, from the Matterhorn, we could follow the ridge along the Hurwal Divide or go to Sacajawea Peak, the tallest point in the area. Not knowing if there was a way to get there, we opted for just following the trail and decide later. Looking at the map, we noted that the peak where the ridge divided in two had no name so we opted for “Fred”.


Once we got there, we took a bit of time to admire the views and then decided not to continue on to Sacajawea or the Hurwal Divide. From our point of view both trails looked pretty exposed and maybe more dangerous than what they really were. For our return, we had first to go back to the Saddle between Fred and The Matterhorn, climb a bit and then get back on the trail which we did. On our way up, we did notice a huge plateau directly east of the summit. On our hike up, we followed a path on the north side but once we got back down there, we opted for a backcountry route around the lake on the south side. That ended up being a bit more difficult and interesting than expected. Most of the way we navigated thru granite rocks trying to find our way without falling of a cliff. On two occasions we had to backtrack a bit as we couldn’t find a way down but finally, towards the end of the day, we made it to the lake on the south side. From there, we thought going around the lake was going to be the easy part but it turned out to be a lot longer than expected. From the point we got down, we were not able to see that lake actually turned almost around us. In the end, we finally made it before sundown and in time for dinner.


Day 3: Ice Lake to Douglas Lake

The Plan was to go as far as we could during the day so we could have time to climb Eagle Cap later on. That meant not staying at Horseshoe Lake, one of the most scenic lakes in the area but continue, possibly to Image Lake. With that in mind, we woke up early and by 8:30 we were already on the trail. The first part was easy and known as we were on the steep descend from Ice Lake all the way to the Wallowa River. Since we knew the scenery, we took a bit of time to see the variety of wildflowers. Once we got back down, we crossed the river again and made a short stop at the campsite we found on our way up. From that point, we continued towards Six Mile Meadow. This section of the trail gently climbs thru the forest with limited views of the ridges on both sides. That gave us the opportunity to cover the distance quickly until we got to the meadow where we had two options. The trail we were not taking is a shortcut that cuts the best part of this loop, so we turned right towards the Lake Basin. The first thing we encountered was that the trail was inundated. We followed the little stream for a while until we got out of the running water and ended up next to the river. At first we couldn’t see where to cross and being early in the afternoon, we opted for stopping for lunch and then investigate if we needed to jump, swim or find a log to cross. As we were having lunch, another couple arrived and indicated that there were a couple of logs not to far downstream that we could use to cross safely. After lunch and getting our feet wet in the river, we hiked to the logs, crossed and then crossed again two more times to actually get to the other side of the river and back on the trail. As we climbed towards the lake basin, we got some nice views of the mountains far ahead that we eventually would get to. Not long after that, we finally made our way to Horseshoe Lake where we found some incredible scenery. We kind of regretted not having more time to stay there the night and continue on to Mirror Lake the following day, but we wanted to save time to climb Eagle Cap.


As we were circling the north shore of the lake, we stopped to talk to a group that was staying the night there. Our plan was to continue to Crescent Lake but they mentioned that Douglas Lake was a lot prettier. Looking at the map, we noticed that you can go either way so we decided to wait until we got closer and to make a call then. Once we left Horseshoe Lake, the trail got a bit confusing. We found a couple of un-marked forks where we had to go with our best judgment. That eventually took us to another lake tucked in the trees. Since we had not seen the fork to Crescent Lake, we assumed for a while that we were looking at a small pond that shows in the map that, if it was the case, meant that we had passed Crescent already. That didn’t make a lot of sense so we continued on and finally got to a bigger lake. Since it was getting late, we decided to look for a campsite, set up and then, during dinner, take a look at the map and try to figure out where we were. After a bit of debate, we finally figured we were at Douglas Lake and that we had missed the fork to Crescent Lake. The Lake we had seen earlier was Lee Lake. That meant we had made it to our intended destination and that the following day would be a short hike to Mirror Lake.

DAY 4: Douglas Lake to Mirror Lake and Eagle Cap climb

One of the great things about doing a multi-day backpacking trip is that your days usually start with great views. Waking up in front of Douglas Lake was fantastic and gave us the energy to tackle the day


After a nice breakfast and breaking up camp, we continued our way towards Mirror Lake. At first, the trail continued circling Douglas Lake but then veered of from it and we started climbing. It didn’t take long to come up to the next lake, actually a little lakelet that is connected to Moccasin Lake. As we walked on the north shore of the lake, we started to get our first glimpses towards Eagle Cap. Towards the end, we came to the Mirror Lake fork between Moccasin Lake and Sunshine Lake. We noticed that to continue on day 5, we were coming back to this point and taking the trail between the lakes which including jumping from rock to rock. From there, a short climb brought us to Mirror Lake. We hiked for a while around the shore looking for a possible campsite which proved to be a bit more difficult than expected. On one side, there was a lot of people camping in the area and on another, several campsites where closed for restoration. After a while we finally found a good campsite that was a bit away from the lake but still had great views. After setting up camp, we had a light lunch and planned for the afternoon. Brian was having a bit of foot pain so he decided he was not going to climb Eagle Cap with us so after getting our gear ready, Mark and I took off towards the summit.


The first part of the hike took us around the end of Mirror Lake thru a meadow and then to Upper Lake. In sections the trail was a bit difficult to follow as a stream runs thru it from Upper Lake to Mirror Lake. We found Upper Lake to be almost a pond with very nice features. His lake is pretty much melted snow that falls from the mountain behind it. All that water creates a bit of a current that flows thru the lake to the outlet that continues on the small creek we had just passed. Since a lot of rocks in the area have a lot of Iron content, parts of the lake had kind of a red hue while there was a clear blue “river” flowing in the middle of the lake. It was probably one of the most interesting lakes I’ve seen. Unfortunately, pictures didn’t do it justice. We quickly learned that you could not stay there for long and admire the lake, in a matter of seconds; we were literally eaten by bugs so we started moving quickly out of there and climbing towards Horton Pass. As we gained elevation, incredible views started to open up in all directions. Behind us, we could see the entire Lostine River valley where you can see how it was formed by ancient glaciers, to the northeast; we could see the Matterhorn from the other side. From this perspective you could see that it was a single gigantic granite rock with an incredible steep cliff and in from of us, our destination, Eagle Cap. Higher up, after passing Horton Pass, we added lakes and more valleys to our views. Bellow us Moccasin Lake actually started looking like a shoe and the Hurricane Creek valley started opening up towards the north.


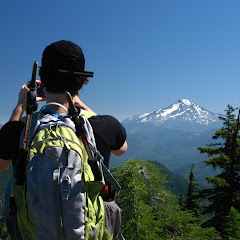
After Horton Pass, views changed completely. We were now on the other side of the ridge enjoying a view that was new to us. Looking at a map, we noted that we were looking at the East Fork of the Eagle Creek. From our point of view, this valley looked greener that the valley we came from which is probably due to the elevation difference and also because this new valley has a lot more sun exposure. Then, we circled back towards the ridge, did a couple of long switchbacks and just when Glacier Peak started showing its peak, we reached the summit. We were not expecting a welcoming committee, but as soon as we put our packs down, two chipmunks came to greet us and hope we would let some food fall on the ground. Needless to say, the views from up there were just outstanding and even better than what we got on the way up. The only added bonus was been able to see Glacier Lake below us (which we could pass on day 5) and the ridgeline towards the southeast. Here are some pictures to describe the views

Glacier Lake


The Matterhorn on the left, Moccasin Lake below and the Wallowa River Valley towards the desert


Our host at the summit


After enjoying the views for a while and waving our hands in the hopes that Brian would see us from the campsite, we hiked our way down the same way we used to climb. After dinner, I took another stroll around the lake to get the different sunset views before calling it a night.


Day 5: Mirror Lake to Frazier Lake

Day 5 was the first of two long days with plenty of elevation gain. We woke up to another splendid blue sky day and where on the trail as early as we could. The first part of the hike was basically retracing our steps back to Moccasin Lake which gave us the same views we saw the previous day, this time, without having to turn around every five minutes. In almost no time, we made it to the fork and turned right towards Glacier Pass which we knew was going to be a hard hike. The uphill came right after a very green and inviting meadow and contrary to what we were expecting, the trail was actually pretty straight with almost no switchbacks. Sooner than expected, we were up in Glacier Pass looking down at Glacier Lake and the Valley of West Fork of the Wallowa River. To our backs, we could see Eagle Cap and Glacier Peak. The scenery was a bit different from what we had seen from the summit of Eagle Cap but the other thing we noticed is that this area had more snow and looked more wintery. We took a short break at Glacier Pass enjoying the views as we knew the climbing was over and from there on, it was going to be all downhill


The hike down to the lake was pretty interesting as we lost the trail a couple of times due to big patches of snow. We finally made it to the north shore of the lake where it flows towards a small waterfall marking the beginning of the river. From that point of view, we could see almost our entire route down the valley towards Frazier Lake. As we started going down, we began to see the most amazing flower display that included Indian paintbrush in a lot of other colors I hadn’t seen before, Elephant Heads, Columbines (or something that looks like a columbine but is yellow) and many others that I don’t even know their names. About half way down, the trail got pretty wet as water was flowing from the side hills down to the river. What surprised us though was the smell of wild onions, they were everywhere. We picked up some and ate while hiking and I saved a bunch that I would use later for dinner. After that, the trail got a bit longer than expected or the day got hotter making it feel like longer. Finally we made it to Frazier Lake that had some interesting features. First was the connection to Little Frazier Lake, a much smaller lake towards the hill but the other was a rock field that looked like someone started throwing rock all the way for the mountain.


After walking around for a while, we finally found a nice campsite on the east shore of the lake. After setting up camp, Brian and I went for a walk around to take pictures but where soon scared away but very hungry mosquitoes. On the way back to camp, we stopped at a sandy area on the shore of the lake and decided to jump in. Being a shallow lake, the water was not too cold so we were able to stay in for a while before heading back to camp and dinner. Right after sunset, temperature started dropping quite fast and a little breeze from the valley started to blow. I can certainly say this night was the coldest of the whole trip even though we were not at the highest point.

Day 6: Frazier Lake to Aneroid Lake

The early morning at Frazier Lake was by far the most spectacular I’ve seen in a long time. Over night the wind died down and we woke up to a quiet, cold and very still morning. The lake was so still that it was a perfect mirror reflecting the illuminated ridge on the other side. It was fascinating to look at an upside down world for a while


After a very cold breakfast we finally left just when the sun finally started hitting our campsite. Unfortunately, because of the angle of the valley we were on, we remained in the shadows for half of the morning. We followed the river and river bed further down finding even more flowers and beautiful scenery and eventually lost the trail. After a bit of map reading we finally figured out that we needed to be on the other side of the river and that we had missed a log to cross. We backtracked a bit, found our way and were back on track to a fork were we would make the call to weather take a shortcut or do the hard climb to Polaris Pass and Tenderfoot pass on our way to Aneroid Lake. As we started ascending on the ridge, we saw the sun line getting closer and closer and illuminate the entire valley towards Glacier Peak. It was quite the scene. Shortly after we finally got the sun on our backs, we got to the fork and decided to take a break, adjust layers and tackle the climb towards Polaris Pass. Almost as soon as we started, we started navigating thru immense wildflower fields were the trail was almost invisible. The variety, colors and abundance was quite surprising considering the weather and elevation.


Then came the switchbacks. I actually can’t recall a trail that has more switchbacks than this one. It certainly makes the climb a lot more gradual and easier to tackle but it also makes it very long. As we gained elevation, or views depended on whether we were making a turn on one side or the other of the switchbacks. On one side we had a view of a bare, rocky slope with amazing colors. On the other, we had a creek valley with trees and flowers. Going from one to the other, was just a flower garden. Finally, as we were getting closer to the pass we left the taller trees and shrubs but not the flowers, even when we were about to get to the top, portions of the slope where covered in Lupine. From there, we could notice a faint straight line to the pass as it went on loose rock that we still can’t understand how could they stay in place. We finally made into the pass and realized we were not exactly were we needed to be. The trail was easy to identify so we backtracked on the ridge for a bit to a point where we stopped for lunch before continuing.


From the ridge we finally got a view to the other side. Originally we thought it would be an extension of the scenery we were leaving behind but we were both surprised and maybe a bit disappointed. All the ridges and mountains on the other side are much lower in elevation so there was no snow and no alpine scenery. The whole area looked like big meadows and drier land. After lunch, we continued on more switchbacks descending to the valley on the other side and traversing towards Tenderfoot path. We had heard from another hiker that there was considerable snow on this route making it difficult but as we traversed, we got the impression he was talking about a complete different trail. This trail, still covered in lupine was more arid than the other side. In fact, we could not see any signs of a creek or water source which, by then started to worry us a bit since it was getting hot and we were quite low on the precious liquid. For quite a while we traversed an endless grass field until we got to the fork with the Imnaha River trail. From there, our last high point of the trip, tenderfoot pass was visible which also reminded us that we were on our way out. Without resting much, we started our way to the pass trying to keep as cool as we could


As soon as we got there, we got a sense of relief. The hard work was over and from there on, it was all downhill to Aneroid Lake. On the way down we soon got back in the shade which was a big relief but not enough considering we had ran out of water. Further down we finally reached a creek were we stopped to drink and filter water for the rest of the day. We were so thirsty that we didn’t even care about the fierce mosquitoes. While doing that, I took the time to take a couple of pictures that I consider to be among the best of the whole picture set


From there, it took us about an hour to get to Aneroid Lake which we reached when the sun was already below the ridgeline. After walking for a while, we finally found a nice campsite next to the lake, set up camp, started a fire and had dinner. Before going to bed, we went to the lake shore to see the stars for a while and saw more than a couple of shooting stars. We were not sure then but that night was the peak of the Perseid Meteor shower so we had a bit of a spectacle.

Day 7: Aneroid Lake to Wallowa Lake Trailhead

This was our last day of the trip with a short hike back to the car. We started at around 9 when the sun had just appeared on the eastern ridge. For quite a while, we walked thru green meadows with small creeks running thru it. It was a different scenery as what we had seen in the previous days as we were at a much lower elevation and parts of this area are actually private land. Behind us we were leaving magnificent mountains and beautiful sceneries. Towards the corner of the meadow, we got back to the river, crossed a footbridge and started a quick descend. At first it was just a traverse on the side of the mountain as we circled the last peak. On that section we found a lot of dead trees. We were not able to figure out why, but it looked like they were attacked by some sort of plague. Certainly it was not inviting and nothing comparable to anything we had seen during the loop. I do recall talking with Brian and Mark that most books recommend doing this loop in the reverse direction as we did. I think if we had done it that way, the first day would have been really disappointing. As we were coming down, and getting closer to the trailhead, we started passing day hikers and horses going up to the lakes for the day. The trail got hotter, the scenery disappeared and Wallowas Lake appeared in front of us. A couple of switchback and we were out and back at the parking lot ready for a 5 hour drive home. I can only say it was a great place to discover and certainly a place I will visit again.


You can check the pictures here

Interactive map

To see the full map, click Menu and select Full Screen. You can also click Terrain to change the map style

Mt Adams climb, Jul 30th

This is becoming a yearly thing I guess as this is the third time I do this trip. As last year, I planned to leave early on Saturday, drive to the ranger station to pick up the permits and then get to the trailhead and start climbing. At the ranger station we learned that, with all the snow still lingering around, the summer route was not doable. I didn’t know the south climb or the route I’ve done in the past was known as the summer route or that there was an alternative. They told us that, instead of turning northeast and crossing the Morrison Creek to keep straight up and follow the path being careful not to go the wrong way. So a bit baffled, we drove to the trailhead and, as informed, we found some patches of snow at that elevation. Once on the trail, we found several patches here and there until we got to the fork with the trail that goes around the mountain. From that point on, we were on snow. This is pretty rare this time of year but a clear indication to what lay ahead. This route, contrary to the normal route seemed steeper and more direct to Lunch Counter as we noticed that we were gaining elevation quite quickly. The views were not late either as we got the amazing view of Mt St Helens right next to us and Mt Hood in the back. As we continued climbing we passed right next to South Butte, a small red pinnacle that you can see from the summer trail as well. After passing the ridge, that was the last section without any snow, it was down to the hard snowfield between Crescent and Gotchen Glaciers. At certain points, the hill seems to be as steep at the upper section of the mountain which, with our heavy packs, made the whole thing quite the workout. Early in the afternoon we finally made it to Lunch Counter and found some unoccupied wind shelters (the same shelters we used the first time I climbed). Once the whole group got there, we took our time to relax, eat, filter water and set up our tents. Later in the afternoon we took a walk towards the eastern side of Lunch Counter that overlooks the Mazama Glacier. Views were fantastic as ever. On our way back, as the sun was setting, we got a pretty spectacular show of colors and scenery as Mt Hood turned red and Mt St Helens stayed in the shadows. On Sunday we woke up to a magnificent clear day. After a quick breakfast and breaking down camp, we got ready for our summit and started climbing. As soon as we got to the slope, we noticed that wind was picking up. That was kind of refreshing as it helped us cool down a bit as we climbed. With temperatures starting to rise, we got a perfect demonstration on how weather works. Wind started picking up moisture from the melting snow and taking it up the slope towards the summit. With the colder temperatures up there, clouds started forming really quickly. As we were approaching Pikers Peak, we could see that clouds were increasing pretty fast to the point that, once we got to Pikers Peak (the false summit), the rest of the mountain was completely covered. We made a quick stop to adjust gear and then continued up straight to the summit. We did this section pretty much by memory as there was absolutely now views. Once at the summit I just put my camera away as there was no point in even taking it out. We stayed there for just a couple of minutes and then got ready to glissade down. From the summit to Pikers Peak we took an alternate route that allowed us to get there faster. Then, it was a single run all the way down to Lunch Counter. The glissade was a lot fun despite the two girls in front of me stopping all the time as they didn’t want to go too fast. Once at lunch counter, we took a break to re-group and eat something before heading down which happened without any major incidents other than taking the wrong route which we had to correct. In all it was a fun trip and always good to be on the top of a big mountain. As with the trip last year, we didn’t get the views so we’ll see what happens next year


Interactive map

To see the full map, click Menu and select Full Screen. You can also click Terrain to change the map style

Table Mountain from the North, Jul 10th

Table Mountain is that prominent peak on the other side of the Columbia River near Bonneville Dam. If memory serves me well, I have climbed there at least three times via the Heartbreak trail. Yes, the name is appropriate for this trail as it climbs relentlessly to the top passing by a rock slide and numerous switchbacks where you have to make multiple stops to catch your breath. The rewards are incredible as you can get to the very edge of an incredibly high and vertical cliff that overlooks Bridge of the Gods, the river and Mt Hood in the distance. From the top, you can hike to the north, pass the actual summit hidden within a small forested area and come out on the northern side that offers equally impressive views. From that point, I noticed in the past a faint trail that continued on the ridge and got lost in the forest to the north. Most books and guides don’t show this route as it’s not an official trail but looking at map, you can make certain features that make this access possible. The most important aspect is that the PCT goes around Table Mountain so any access would veer of this major trail. After doing a bit of research, I learned that you had to navigate of trail towards the power line and then follow very old and abandoned jeep roads and user paths to reach the summit of Table Mountain. What proved to be hard was finding the trailhead though. After driving for a bit around different forest roads and realizing were close to the trailhead but not on the right road, we opted for just parking the cars and bushwhacking to the trail. That added a bit of extra adventure and a bit of a warm-up for what lay ahead. Soon after we were on the PCT walking thru the forest with more than a couple of openings offering views of Helens, Adams and even Hood. As we traveled south, we reached a point where the PCT veers hard to the right to start descending towards the valley skirting the power lines. At that point I found a very faint path that continued down towards one of the towers. Once we got down there things got a bit more complex as we found a service road for the power lines and not one but two jeep tracks following south. Making my best judgment, I opted for the road on the left which proved to be the correct option. Certainly this road has not seen traffic in a long time given the undergrowth and obstacles we found. Still it was not very difficult to navigate this mile long road to the end. After that, we continued on a faint footpath that followed the ridgeline switching back and forth between the east and west side. On this section we found one of the most beautiful wildflower displays we had seen so far this season. The hike was very interesting as well as we had pretty steep cliffs on both sides of the ridge. After about a mile and a half off cuts, bruises and some heavy bushwhacking, we finally came to an opening that I recognized as the faint trail that is visible from the top of Table Mountain. Further ahead was the actual peak which required a very short but very steep climb to reach. The views were magnificent as expected so we stopped for a while. Before heading back, we decided, since we were already there, to hike to the south view point and enjoy the views of the Columbia Gorge. The return was easy, following the same path we did to get up there, but after doing this trail and considering that it certainly has less elevation gain that the Heartbreak Trail; I can’t say for certain it’s easier. The effort for the elevation we didn’t gain was certainly used to bushwhack our way there but it was totally worth it


Interactive map

To see the full map, click Menu and select Full Screen. You can also click Terrain to change the map style

Quartz Creek Backpack, Jul 2nd

Ever since I went to Quartz Creek I’ve been wanting to backpack in the area. After a failed attempt back in May when we had to cancel the backpack due to snow and conform with just a day hike, it was time for one more try. We still found snow so we were not able to do part of the loop I wanted to do but finally I was able to explore the upper section of this wonderful trail. Since my last trip was not long ago, I will spare the first part of the trip as there’s not much to say about that I have not said before. The only great news is that WTA has been actively working in the area so the lower part of the trail is in much better condition than before; in fact, we even saw bike tracks on the trail which I don’t know if I feel happy about. On our way in, we made a short stop at the small campsite near the junction with the Quartz Creek Ridge trail which has always been the point I get to on a day hike. After that break, all was new to me. The trail from that point on actually climbs away from the creek as it skirts the canyon and goes uphill. There are few viewpoints and many sections with downed trees that required some heavy bushwhacking that, with a heavy pack is a whole other story. We crossed a couple of creeks and finally got back down to Quartz Creek and big log to cross it. By then we were all pretty tired and it was getting dark so instead of continuing to the intended campsite on the French Creek trail, we decided to stop there at a small campsite we found. After setting up camp and getting water we started a fire and made dinner which was accompanied by a delicious Pizza that Celeste brought for all of us. Later that night, I looked at the map and decided that, instead of breaking up camp and continue further to a second campsite, it made more sense to leave camp and do a day hike. That way our hike out on Monday would not be too hard. On Sunday we woke to a rather cold morning which forced us to have an early fire. After a nice breakfast and another food surprise, we took off on our day exploration of the upper section of the Quartz Creek trail. The first part was a bit of an uphill with a couple of downed trees but much cleaner than the previous section. On our way up, we crossed a couple of smaller creeks that were a bit unusual. In most cases, the creeks we find are filled with rocks and shrubs. The creeks in this area are basically a very long rock slab that resembles a slide. Crossing these is not as easy as one might expect though. Since there’s no rocks to hop on or under water and the rock surface is slippery, there little to hold on as you cross. So even with water rushing at ankle level, you feel the creek trying to drag you down. On the second creek crossing, we could see the water flowing down a small and very steep canyon down to a pool far below. On that same pool we could see more water pouring from another side but we were not able to see where it was coming from. Shortly after the cross, we came to the intersection with the French Creek trail and noticed a side trail to the side. Hearing a roaring waterfall we decided to check it out and discovered the other source of all the flow in to that pool we could see. Just from the side of the trail there’s a 60’ drop with a beautiful waterfall that plunges into an enclosed canyon far below. On the side of that canyon is the smaller waterfall from the second creek and further down the creek continues thru lush green forest that get water all year long. The views from the top were amazing and inviting enough to make a mental note to try to find a route to go down on our way back. We continued up getting closer to the ridge line but without any interesting views. In the end we got to the top to a trail sign at the fork with the boundary trail that opened views to the Juniper Ridge where could see Jumbo Peak and Sunrise Peak. At the top we found a lot of snow so we continued for a while until we realized there was no easy way to predict how the rest of the day would go. So after exploring for a bit, we turned around and started heading down the way we came. Once we got back to the fork with the French Creek and crossed the second creek, we started looking for a possible way down. After a short walk on the trail and passing the waterfall, we found a ridgeline that seemed doable to climb down. We tried that and ended up descending all the way to the creek where we found a couple of large logs right where we needed to cross. After that, a short bushwhack took us right to the base of the waterfall. I think the only word I can say about the view is spectacular. We stayed there for quite some time admiring the scenery and the waterfalls before continuing down back to campsite. For our last day, it was just the hike out the way we hiked in on Saturday so after a good breakfast, we started our journey back out. I can say I’m happy I finally made the backpacking trip to Quartz Creek but somehow have the feeling I didn’t explore everything I wanted to explore. We did not make it to the Dark Meadow so I guess I will have to come up with yet another trip to this area. The only thing is, having done this trail three times already; I need to give it a rest for a while. Perhaps next time I will approach it from a different route.


Interactive map

To see the full map, click Menu and select Full Screen. You can also click Terrain to change the map style

Olympic Coast, Jun 24th

After an epic fail about two years ago, I had to try the Olympic Coast again while trying to avoid all the pitfalls. In my first attempt I made the mistake of underestimating the route and over estimating the group which in turn brought a bunch of other issues. I will not go thru the whole story here but just imagine being showered with Diesel fuel before we even got on the trail… I’ll let your imagination fly. The Olympic Coast trail basically covers the whole coast of the Olympic Peninsula. In the southern section, near Forks, there’s a remote 18 mile section that you can do as a car shuttle. With a much smaller group of four experienced backpackers, we left early in the morning on Friday with ample time to get permits, have breakfast and leave a car at the exit point at Third Beach. Then, on our way to the trailhead we got a pretty strong passing shower so we were a bit skeptical on how the weather was going to play out for us, but as soon as we hit the trail, we had beautiful blue skies and perfect weather. For this first half hour or so, we walked on the north side of the Hoh River towards the ocean with limited views thru the bushes. From there we got our first glimpse at the type of scenery we would enjoy for the following couple of days.

Hoh River Delta and Middle Rock


As soon as we turned north on the coast and left the Hoh River behind, we found ourselves walking on an immense beach. We could see far in the distance plenty of rock formations at sea. Our first highlight came shortly after that when we got to Diamond Rock, a conical rock right on the shore. We were close to the lowest tide of the day so we were able to get really close to it. Right after we had our first challenge, a rocky section that requires the tide to be below 2 feet to pass. Jumping from rock to rock, we made that section while watching the waves break into the rocks. It was quite the spectacle and soon enough, we were on the other side, walking on a sandy beach. Although Jefferson Cove is very inviting, it’s easy to see that staying there for the night could be a bit problematic if the tides get high enough. At the northern end of the cove, we found or first set of ladders, the other repeating theme of this trip. Looking at a map, you can see that there are numerous heads with rock cliffs down to the ocean. The only way to pass those is to climb over, hike on the forest and then climb down on the other side. Due to erosion and the steepness of the terrain, there are rope ladders on all these sections. After climbing the first section, we had a second where only the rope was available. Right after that, we landed on mud, deep mud. For the following couple of hours, while we hiked thru the forest to Mosquito Creek, we passed numerous muddy sections where our sandals would get caught forcing us to dig in and pull them out. This made our pace go a bit slower as we needed to keep our balance while sliding everywhere. Along this trail we got numerous views of little bays bellow us and a very lush forest. Finally we made it to Mosquito Creek were we found a nice, occupied campsite right next to the creek. We hiked back a bit to another big campsite right above the coast line to stay the night where we had some really nice views of the coast.

Looking South towards Hoh Head from the campsite


After setting up camp, making a run to get water and having dinner, we enjoyed a spectacular sunset. Mark and I, looking for better or different views, climbed down to the beach and follower it south to the end and climbed over a small head to a small cove on the other side. It was a perfect way to end the first day of our trip.
On Saturday, we started by climbing down to the beach and hiking north on the soft sand. We crossed Mosquito Creek and continued on with looming grey clouds above us. On this long walk we passes more rock formation on the coast, one resembling a fin and others looking like spears. As we walked, the weather seems to be unsure of what to do, whether to give us some rain or some sunshine. Towards the end of the beach, we passed by one of the bigger rock outcrops that looked like a little island. On this rock, some vegetation was able to grow and you can easily see a complete ecosystem surviving right there. We got to the end of the beach roughly at noon so instead of going ahead and climbing the stairs, we decided to explore a small cave on the left side and have lunch in it. That proved to be a wise decision as it started raining while we were there.

Mark and Brian in the cave where we had lunch


After lunch and the rain, we headed up the rope ladder as we needed to hike around the head and cross Goodman Creek. This section of the trail is probably the most beautiful coastal forest I’ve seen. Not only has some of the biggest trees I’ve seen but also lush greens.

On our way to Goodman Creek


Once we got close to the creek, the trail got interesting. We had to switch back and forth many times as we walked on downed trees that have been carved to form the path. At some point, almost on top of the creek, we found ourselves climbing down next to a fallen tree that almost seemed like it was put there so you could climb down. We passed a small tributary to the main creek and more huge trees before we actually made it to Goodman. After crossing the creek a couple of times, we heard a small waterfall nearby and decided to walk upstream to find it. Looking at the map latter we learned that this is Goodman falls, a small multiple stream waterfall that probably dries up in the summer. After that, we continued walking thru giants and mud and eventually passed by the biggest tree I’ve seen. This particular tree had roots that actually looked like separate trees attached to the main trunk. Looking up, you could see other plants growing from the branches of the massive tree.

The biggest tree


Soon after, we were back on the beach walking towards Toleak Point. This point is a very shallow head that, when the tide is low, rises above the surface showing a big field of rocks. We made a stop here to explore a bit while enjoying the views to both sides. Towards the south, we could see the head where Goodman Creek is and the rock with the natural arch. To the north, we could see Strawberry point and the Giants Graveyard. While we were sitting on the rocks, we noticed a couple of seal popping their head above the water and looking at us.

Toleak Point


We continued on the beach passing Strawberry Point, another huge rock formation on the coast line and headed towards Scotts Bluff where Scotts Creek dumps its waters into the sea. I can say this last section is probably the iconic part of this trail where you have the bulk of the rock formations out at sea. Being Saturday, we got to Scott Bluff only to find most, if not all of the campsites already taken by weekend warriors that come here just to spend a night in the coast. Just before the trail turns back and goes uphill, we found a small space, big enough for our tents where we were able to set up camp. The advantage was an incredible front seat view of the ocean and another spectacular sunset.

Early morning view towards the Giants Graveyard from my tent


Sunday came and our time to hike the last portion of this trip. Since we were almost right next to the next head, we started hiking up gaining considerable elevation and then descending on the other side to Second Beach. Here we got more great views and more rock formations until we got to Taylor Point. I did remember from my first failed attempt that at this point, you had the chance to go over the rock formation using rope ladders or actually hike around the rock, getting your feet wet and crossing a small cave. Having very adventurous friends with me, we opted for the later. We found a tree that had fallen into the mouth of the cave so before we could even get in, we had to break a lot of branches and clean the path to climb down to the cave and walk around it. Once on the other side, we sat for a while in a tiny rocky cove before heading up the rope ladder. While resting, a deer came down from the mountain and passed by and around us and then climbed back up on the other side. Although it’s known that there’s deer in the coastal forest, is not a sight we were expecting. Then we climbed up on got our last view of second beach and Strawberry point. Half way thru the forest we got a glimpse of Third Beach, our last section of coast line before hiking out to our car.

Third Beach


Once at third beach we felt like the hike was over. Being the first beach you get to from the trailhead, we found a lot of people that erased from our minds that sense of wilderness we had the previous two days. Still it was a comfortable hike to the trail and then back to the car.


You can check the pictures here

Interactive map

To see the full map, click Menu and select Full Screen. You can also click Terrain to change the map style

The Silver Star Grand Adventure, Jun 12th

If you look at a map of Silver Star Mountain in Washington, you’ll note there are several approaches to the summit. In the past I’ve done Ed’s trail which is an easy hike on a ridge that requires a long drive on a very bad road. I had also attempted the Starway trail a couple of times with no success, either because of just being tired or too much snow on the ridge. This time I decided to take this to the next level. Not only was I planning to do the entire Starway trail and summit Silver Star from that approach but also, I wanted to come down a different trail that I had not yet done. The combination of both trails plus the section required to reach the Summit of Silver Star placed this hike in the very difficult range with over 12 miles and about 3000 feet of elevation gain. Oh, and we needed to do a car shuttle. So I met with a small group of brave souls to tackle this hike and took off to Silver Star. The first problem we found was that the road access to the exit point (the Bluff Mountain trailhead) was snowed in from about a mile in. That meant that, to complete the loop, we would have to hike an extra mile on the road. Everyone Ok’ed this so we proceeded with the plan. The first part of the hike was uneventful and being a steep climb deep in the forest, we did it at a steady pace. After a couple of hours of huffing and puffing, we made it to the snow level and some views of the northern ridge. Shortly after that, we reached a small peak with no name that I’ve come to call the “oh shit peak”. From that point you finally get views all around you and realize you are not at the summit of Silver Star, in fact, the destination looms on the other side of a valley way out there, almost unreachable. Still, if you only get to the point, you should be proud and the views will be rewarding enough. Not only the ridge line and Silver Star look amazing from this spot but also, you can see several waterfalls on the northern side of the mountain that are invisible from anywhere else. One of this falls, way down the valley, falls sideways into a rock carved canyon that look impressive even from high up in the mountain. I’ve promised myself that one of these days, I’ll do a bushwhack adventure and try to reach it.


After a short lunch break, we continued our traverse by climbing down on the saddle that connects “Oh shit peak” with the ridge that goes to Silver Star. In this area, I had to navigate a bit as the trail was covered in snow. Still, I was able to reach my mark, the junction with the Bluff Mountain trail, with no problem. Once there, as I had planned, I consulted with everyone whether we were continuing as planned or not. We decided to go for it. Navigating the backside was actually easier, for the most part, than what I had expected. The trail followed a rocky ridge curving towards Silver Star. Not only the trail was very interesting to do but the views, despite the weather, were incredible. Nearing Silver Star, I lost the trail and started climbing a bit towards the peak, thinking that we could scramble up and make it. Just by luck, we found a rock arch on our path and were able to climb to it. It was a very interesting sight whether you were looking in, out or thru it. In the picture set, you’ll see one photo that looks like a crushed rock face that was taken in that spot. After looking around, we finally realized that there was no easy way to scramble up to the summit from there so we started climbing down and were able to make some faint tracks down below. After making the turn, we made our way and finally found the trail to the summit. Although we didn’t have a clear and crisp blue sky day, the views from the summit were very nice. We took a short break there before heading back down as we knew we still had a long way to go. We retraced our steps back thru the ridge all the way to the fork with the Starway trail where we re-checked our time and energy to continue. Everyone was remembering the arduous hike coming up so we all opted for trying the Bluff Mountain trail to where my car was parked. From our point of view, we could actually see most of the trail as it traversed around Little Baldy and Bluff Mountain. As we were hiking the views of the valleys to the north changed three times and the valley to the south did the same twice. Way back we could see Silver Star and almost the whole route we had made so far.


After passing Bluff Mountain we found considerable snow and lost the trail one more time. I navigated as good as I could but noticed, after a short while, that we were not on the right path. Not only were we heading south but we were actually gaining elevation. At some point we decided to turn around and hike back and take an alternate route to avoid the ridge we had started climbing. We could make the trail ahead of us so we just went straight to it. That ended up not being a great idea as we had to traverse a snow filled, rock slope. That took about an hour to sort but finally we made it to the trail. By then it was already starting to get dark, not because of nightfall but because there was some rain approaching. We hiked, and hiked and hiked snaking around small mountains and slowly descending, passed a couple of snow fields and finally saw the road up ahead. By then we were all hiking in auto mode. We made it to the road and then hike the extra mile back to the car just in time to avoid the rain and night fall. It was an epic hike, maybe more after I learned that there have been very few that have done this entire loop.


Interactive map

To see the full map, click Menu and select Full Screen. You can also click Terrain to change the map style

Huckleberry Mountain via Bonanza trail, Jun 5th

The Bonanza trail is a weird thing in a good way. This trail has been in my to-do list for quite some time and the only reason I had not done it before was because I knew there were some parking issues near the trailhead. According to the information I had, there were very limited spaces you could use near the trailhead as it’s located in a residential area (a very nice area btw). As I drove there, I noticed a couple of places where it seemed I could park but I opted for a safer place to avoid being towed away. From the trailhead, it’s difficult to say how much traffic or maintenance this trail gets. Obviously the locals use it but there are some sketchy spots were it seems like the trail doesn’t get a lot of attention. For starters, the maps show one trailhead but there are actually three places where you can start from. If you start from the one indicated in the maps, as I did, you’ll see all three and notice an absurd loop back. After passing all that and realizing you are actually on the trail you want to be in, you get to a small creek that is absolutely beautiful. The creek doesn’t have a name and there’s no bridge over it which would indicate that it may dry later in the season. I had to walk upstream a bit to cross on a couple of logs I found. From there on, you continue hiking on a gentle slope alongside the Cheeney Creek. There’s a spot along the way were you can see huge boulders on the creek bed surrounded by multiple little branches as the creek goes around them. I was able to climb down there and take a couple of nice pictures as I enjoyed the scenery. Shortly after, I left the creek behind and started the arduous climb. The trail got drier and the scenery around me changed a bit. You could say it was almost arid in places with limited views of the Salmon River canyon. About halfway thru the hike, the trail passes by an abandoned mine on the hill side. I knew about this so I had a couple of light sources I brought with the intention of exploring the shaft. Unluckily I wasn’t able to do so. The mine was completely flooded. After the mine, the trail is not very interesting but it’s certainly a difficult climb as you climb roughly 1700 feet in about 2 miles. Near the top, where the Bonanza trail joins the Huckleberry trail I found a bit of snow but nothing that would have prevented me from navigating thru and reaching the top. Once on the Huckleberry trail, you reach the summit pretty quick but there are no views as it’s covered with trees. To get the big rewards of this hike, you have to continue on the ridge for about half a mile to a saddle where you are welcomed with a spectacular view of Mt Hood. Looking north from that same point, you can see Adams and Rainier while Mt St Helens hides behind the tree line. I had a bit of a déjà vu moment when I got there as this is the same destination you can get to from the trail that starts from the Wildwood Recreation Site and Picnic Area (which obviously has much better parking)

You can check the pictures here


Interactive map

To see the full map, click Menu and select Full Screen. You can also click Terrain to change the map style

Grassy Knoll and Big Huckleberry Mountain, Jun 4th

As weather is getting better and better every day, I opted for a long hike with some elevation and interesting views and what a treat I got. Grassy Knoll and Big Huckleberry are like two hikes in one. Located in the Washington side of the Gorge, you can do the short version just to Grassy Knoll, or the more adventurous trip to the second Big Huckleberry. After getting all the information, map and forecast, I went out with a small group of just one extra hiker. I guess part of that was due to the possibility of finding snow on the trail. Oh well. After meeting up, we drove to Triangle Pass where I thought the trailhead was (as it shows on the map). Contrary to any information, I had, we did not find any trail signs or other cars. After trying to solve the puzzle for a minute or two, we decided to follow the trail as it was going in the right direction. After about one hour of hiking on a not very well maintained trail we finally got our answer. We did not start at the right trailhead but from an alternate point a bit over a mile south. Obviously there was a big parking lot and a nice trail sign at that point and you could see a nice trail curving around going towards the ridge. So we followed the trail and very soon started getting very impressive views. The first thing we noticed was that most of the trail just follows the exposed ridge so the views are not only open to the north east with Mt Adams in the distance but also due South with Mt Hood and the Columbia River Gorge. About half an hour after we passed the trailhead, we got to one of the smaller peaks on the ridge. From this rock formation we got a fantastic view of Mt Adams in the distance and the Big Lava Bed below us. This area was flattened by a smaller volcano that erupted many, many years ago. The trail continued in the forest for a bit as it turned west until we saw the rock wall just bellow Grassy Knoll. As we got closer to it, we started turning and at some point we veered left and continued skirting the mountain until we reached a big snow field. Instead of going straight, where the trail is supposed to be, we followed a foot path on the edge of the cliff that took us straight to the base of where the old lookout tower used to be. Needless to say, the views were incredible with distant peaks, green valleys and not single cloud in the sky. From Grassy Knoll we could see part of the trail as it continued on the ridge and more patches of snow. We continued traversing without any major hiccups until the trail seems to veer off the ridge to the west side. Later we found that it was basically avoiding some rock formations that would have not been easy to traverse. The problem is that we got in the shaded area of the forest so we found a lot more snow and soon enough lost sight of the trail. AS I navigated thru the forest, we passed by a small canyon with big rocks on our right. I was guessing the trail would be there somewhere until I fell in a posthole deep enough to get my hole leg in it. After that little incident, we corrected a bit and continued until we saw the ridge again and found the trail… well, not actually the trail but clear indications of it. Finally we made it to the point where the trail intersects another trail that leads to the top of Big Huckleberry. We followed that path and shortly after we were sitting at the top of the mountain enjoying the views. The only weird thing we found up there that I don’t recall seeing anywhere else was a lot of ants. The weird part is that all where clamped onto any little piece of plant, bark or leaf they could find. It almost looked like a little life safety boat with a bunch of survivors on it in the immense white snow ocean. After enjoying the views for a while, we started our hike back the same way we came. Once we got to the real trailhead, we realized we still had a bit over a mile to go to reach the car, so instead of being a bit over 10 miles ended up being a 13 mile hike.


Interactive map

To see the full map, click Menu and select Full Screen. You can also click Terrain to change the map style

Rock of Ages, May 30th

Rock of Ages is one of those hikes you hear about but can hardly find information on it. The main reason is because it’s a very difficult, unmaintained trail that is no longer on the maps. About two years ago, I attempted this hike without very good results. Despite the fact I was able to climb all the way to the plateau, at some point I lost the trail and ended up bushwhacking my way down. I recall it being a very long day were I thought I would be spending the night somewhere up there. Maybe that’s why it took me so long to re-visit this trail and do the loop I had intended back then. So better equipped with proper maps (not that I didn’t have them back then) and a GPS, I embarked on a mission to conquer the loop with a small group of brave hikers. Having hiked the Quartz Creek the day before, I opted for a later start considering the drive was quite short to his trailhead. We started up on the Horsetail trail and very soon, after passing a couple of switchbacks we got to the famous tree with roots that resemble a small staircase. We climbed those three or four steps and found the uphill trail just behind it. The climb was quick and steep with numerous switchbacks and going over loose grounds, exactly as I remembered it. Not long after we came to our first fork that most people ignore and just continue up. Knowing better, we turned left and followed a faint path to the Arch, one of the highlights of this hike. The Arch is just a rock outcrop with outstanding views of the Gorge. Right in the middle of it, there’s a small arch (big enough for two or three people to sit under it) that formed by years and years of wind erosion. From that vantage point, not only you can see the eastern side of the Columbia River Gorge but also the cliffs and peaks on the Oregon side. After a short brake, we climbed down and went back to the fork to resume our climb towards the Devil’s backbone. Although most of the trail is covered, it travels on a ridge where you can easily make the steep cliffs on both sides. After some more switchbacks, we came up next to a rock wall that can be climbed or walked around. That wall is actually the beginning of the Devil’s Backbone, a bare rocky ridge with steep drop offs on both sides. Definitely not for the faint of heart and not the best place to be in a storm. We found another group having lunch at that spot so we stopped for a couple of minutes before continuing on. From there, the trail dives into the forest but it doesn’t level or go down. By that point, we still had about 2/3 of the elevation to gain. From there to the plateau, the hike was pretty similar to other steep hikes in the gorge like Rudolph Spur or Ruckel Ridge. Then, all of a sudden, the trail level a bit and we got in a foggy forest. I started having some déjà-vu moments as I recognized some of the views I saw two years ago as I was getting lost. This time, without snow on the ground, the footpath was easy to follow until we got to the Horsetail trail. Shortly after the turn, we came up to our first creek crossing. It was not a big thing but we still had to find a good spot to walk on rocks and logs to make it. Being a bit after noon, we stopped on the other side of the creek for lunch while we watched the water rush thru rocks and logs. From there, we continued meandering thru a lush forest and crossed two or three more creeks on the way. We knew from several reports that the last creek, the Oneonta Creek, was running pretty high making that last crossing a bit of a challenge. A friend even sent me an email indicating they had flagged the best crossing point when they did it. As we continued traversing, we turned in towards a canyon and started descending a bit into wet lands. At that point we could already hear the rushing water but only saw the creek when we got to it. Yes, it was running much higher than usual. The strange thing about this trail is that, if you look at the map, the trail crosses the creek, then loops back and crossed again on a wood bridge about a quarter of a mile downstream. A good friend told me he was able to bushwhack down and find the trail after the second bridge eliminating the need to cross the creek. My idea was to try the same thing but what I was not counting on was having mature Devil’s club all around. After a couple hundred yards of bushwhacking we decided it was better to just get our feet wet. Interestingly enough, the point where we ended up crossing ended up being much easier than the marked path on the trail. As we crossed the frigid waters, we only found a single knee deep pool that was easy to manage. Although weather forecast was not indicating it, it started raining the moment we got to the other side, so we quickly dried our feet, put on the shoes and continued hiking along the Oneonta Creek. After that, sun came back just in time for us to make a quick stop at triple falls to take a couple of pictures and continue down to Horsetail falls. In the end, we were able to complete the loop with no issues. To me, it felt more of an accomplishment as I had my previous experience in mind.


Interactive map

To see the full map, click Menu and select Full Screen. You can also click Terrain to change the map style

Quartz Creek, May 29th

Our original plan for Memorial Day weekend was to go backpacking somewhere. Originally we thought somewhere in the Olympics but found out there’s too much snow up there. Then we looked south, same thing. Then, as a last resort we started looking closer to home and it occurred to me to backpack the Quartz Creek trail which I hiked last year. Unluckily, weather was not looking good for the weekend so we had to cancel that plan as well. From the three days, Sunday was looking to be the better one so we decided to go to Quartz Creek anyway and do as much as we could. We ended up doing pretty much the same route I did last time with the addition of a side trip to go check out the Lower Snagtooth Fall. We settled up for an early start so we were at the trailhead at around 9AM. On the way there, we noticed the Lewis River running pretty high (there were flood warnings all over Oregon and Washington). The first part of the hike, all the way to Straight Creek was easy going as we walked thru dense old growth red cedar forests. On the way there, we crossed the bridge over Platinum Creek. Last year, when I did this hike, the creek was almost dry. This time though, with all the snow melt, it was running pretty high. That made me start thinking about the couple of creek crossings we had ahead. Then we got to Straight Creek and noticed it was running very high. Crossing it would have been a bit of a challenge so we bushwhacked our way upstream to a big pile of logs and found a way to cross on them. Behind those logs there’s a nice waterfall were last year we took a group photo. This time, the water was high enough that the little dry area was completely submerged. After that little adventure, we started with the hard part of the hike. From Straight Creek on, there’s a lot of blowdown so, not only finding the trail is a bit of challenge but also you need to climb over or go under a lot of trees. In most of the pictures, you’ll notice that we are walking on trees, not on a trail. Snagtooth Creek looked a lot different than what I recalled. Last year, it was a tiny creek that we could easily cross using a couple of rocks. Not this time. We explored a bit upstream looking for a crossing option but did not find any so we stopped for lunch and then headed downstream. We found two good options, one was a very large tree at a steep angle that crossed the whole thing and the other was a couple of logs, one sitting on top of the other that offered equal opportunity to cross. A bit of a bushwhack later, we were back on trail. Shortly after that we started finding snow so once we got to the fork with the trail that goes to Quartz Creek Ridge, we took it and got to the same campsite where I returned last year. It was not as scenic this time but still usable. We talked about continuing on which was very uncertain or, head back and do some exploration. Since we didn’t want to go too far, we opted for the second option and explore a side trail we saw right after crossing Snagtooth. So we got back and took the side trail which ended up being just an animal path. Soon we found ourselves bushwhacking but opted to continue as we could see, far in the distance and hiding in the trees, a large waterfall. We found a path that took us thru a little gorge and a huge log that crossed from one side to the other. From there, I little walk upstream until we got a partial view of a huge waterfall. It was a good payoff for the effort. Then, it was time to head back thru our grueling exercise. As last time, it was a fantastic trip but I still need to backpack in the area!


You can check the pictures here

Interactive map

To see the full map, click Menu and select Full Screen. You can also click Terrain to change the map style

Elk Mountain Loop, May 21st

Located in the Tillamook Forest, Elk Mountain is one of the peaks you can visit. Although the views from up there are quite fantastic and different than the views you get from any place in the cascades, most people do it as a training hike in preparation for longer and steeper climbs in the summer. This trail can be done in conjunction with the King’s Mountain trail forming a grueling loop with lots of ups and downs or the shorter, less traveled version coming back down on the Elk Creek trail. In the past I have done Elk as an up and down only and also the traverse. This time we did the Elk Creek trail to check it out. So we got to the trailhead and I did my normal pre-hike speech explaining what we were doing and what to expect. I did note that one of the hikers in the group showed up in jeans, cotton t-shirt and dressy shoes. I told him that I was concerned about it because I knew how steep this trail is and not having proper shoes was going to be a problem. After a bit of debate, he said he was going to be ok… I was still worried as I though he didn’t know what he was getting into. So we got to the trailhead, looked up, and started climbing. Contrary to most trails that have an approach before you start climbing, this trail shoots straight up, there’s no warming up or getting into it. Just to give you an idea, the total elevation gain of this 8 mile loop is 2350 feet, the summit is at 2000 feet which you climb in 1.3 miles! On the way up, there are several viewpoints that overlook the Wilson River Valley and the highway as you leave it far below. When we got to the first viewpoint, our friend in jeans was panting really bad that had to sit down for a while and rest. About a minute after he started vomiting and my guess is that he was overheating. We waited for a while until he got his colors back and then with Pat he went back down to the car while the rest of us continued on our adventure. After about an hour of huffing and puffing we made the summit just in time to see dark clouds moving in. We opted for a short stop for lunch and then continued on the back side of the mountain where you scramble your way down just to climb back on the next ridge. We did several times until we reached the fork with the Elk Creek Road (an old and abandoned logging road). From there we turned right and started descending towards Elk Creek and soon found ourselves on one foot of snow. This section of the trail is very obscure and dense making it completely different from the ridge walk we had just come from. Shortly after, we found the second fork with the road where we turned right again. As we continued descending, we got closer to Elk Creek which has seen a fair share of destruction. Most of the upper section of the creek is almost covered with downed trees and remnants of old floods. Once bellow a thousand feet or so, the scenery changed a bit and opened up to nicer views of the creek. At some point, almost at the end of our hike, I saw a nice little waterfall and being adventurous as I am, I bushwhacked to it to take a picture. I can tell you I was not expecting the rocks to be as slippery as they were. As soon as I stepped on one rock, I slid sideways, hit my head on a log and landed on my but, in the water… I guess that should teach me a lesson. I did get the picture though.


Interactive map

To see the full map, click Menu and select Full Screen. You can also click Terrain to change the map style